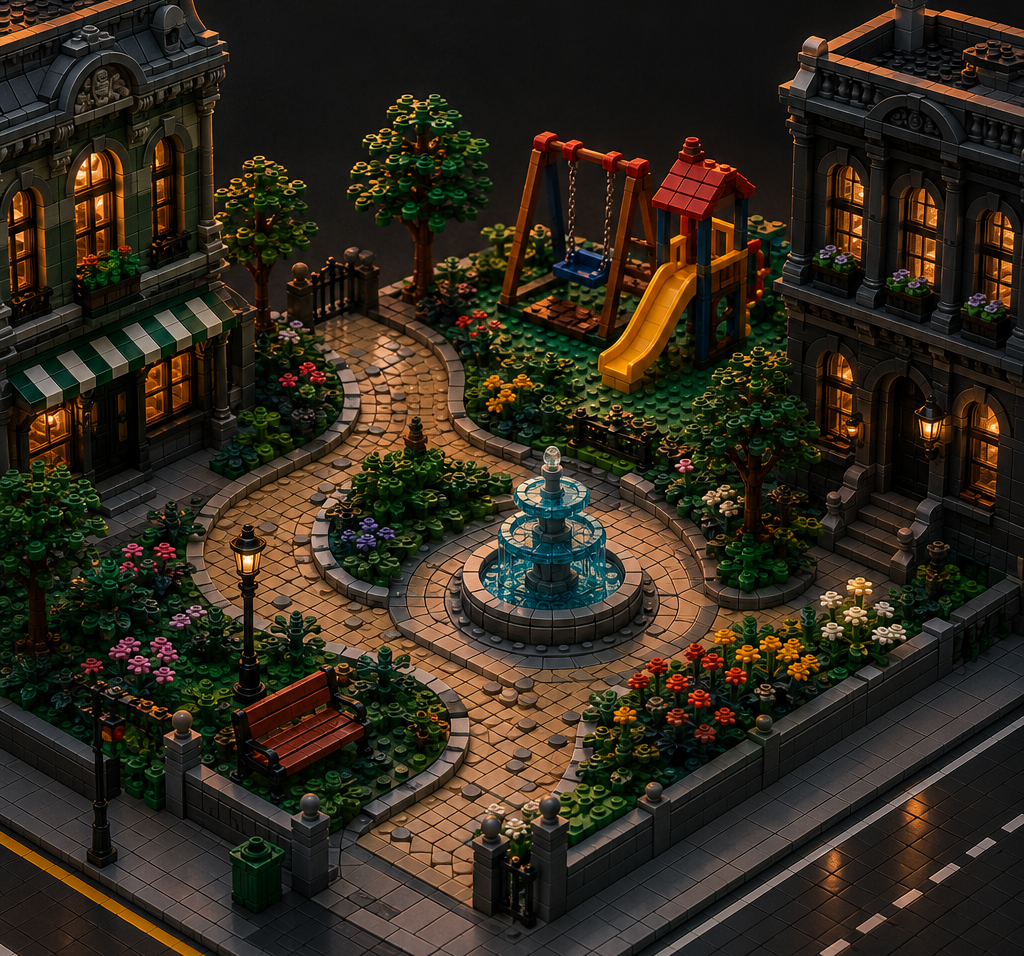
Most Lego park content online is either a single showcase build or a “top 10 park sets” listicle. Neither actually helps you design a park that works as part of a wider city layout.
A good park district is not one hero build. It is a set of components (play equipment, street furniture, paths, planting) that all interface with your road plates and modular buildings at the right scale. This guide breaks the park down by component and function, then covers the space-planning trade-off every AFOL eventually hits: how much green space can your layout actually afford.
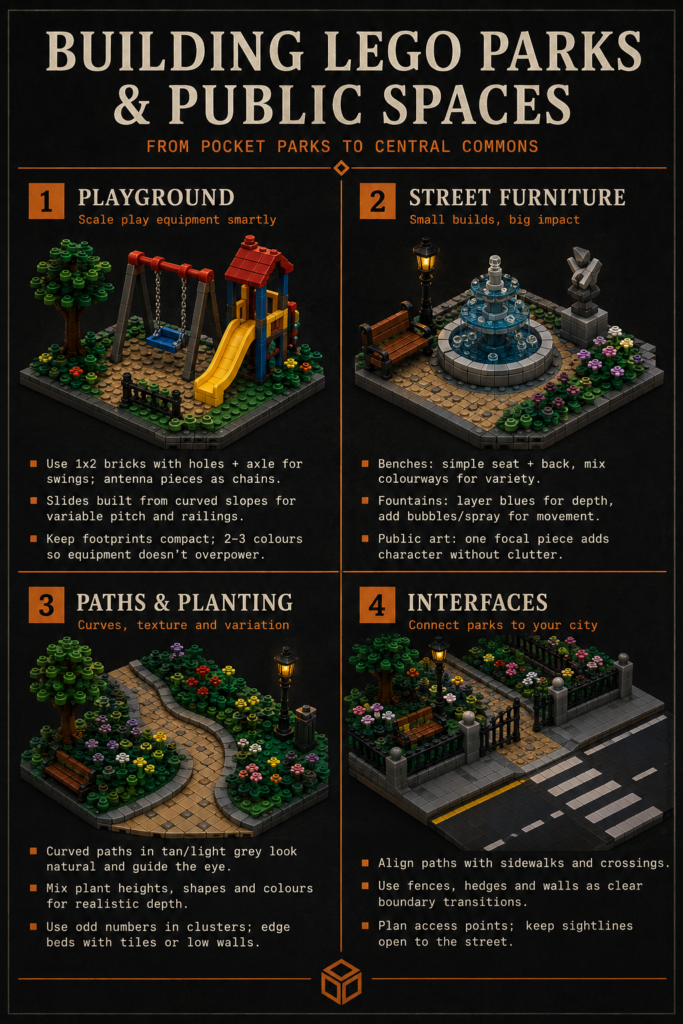
🛝 Playground Equipment: Building for Scale and Play
Playground structures are one of the few park elements where minifig scale forces real constraints. A swing, slide, or climbing frame has to work at 1:36-ish scale without turning into an oversized blob of grey brick.
For swings, the standard technique uses 1×2 bricks with holes on two pillars, with a long axle running between them. Bush pieces on either end of the axle keep it from sliding out. The seat is typically a small plate sized to fit a minifig, hung from the axle with antenna pieces standing in for chains, since actual chain elements read as too heavy at this scale.
A few things worth knowing before you build:
- Minifigs will not balance upright on a swing seat unbraced. Most builders hide a clear or translucent brick under the seat to give the figure something to stand on, which reads as invisible in most lighting.
- Slides work best built as an inclined stack of curved slopes or wedge plates rather than a single long panel, since it lets you vary the pitch and add a railing without extra parts hunting.
- Climbing frames are the one playground element where colour restraint matters more than detail. Stick to two or three colours (commonly red, yellow, blue against grey or tan) so the structure doesn’t visually compete with your planting.
Keep playground footprints small relative to the rest of the park. A single swing set and a slide, built well, reads more convincingly than an oversized structure that eats a third of your available baseplate.
Climbing frames deserve a bit more thought than swings or slides, since they’re the piece most likely to sprawl. Build vertically rather than horizontally where you can (a compact climbing tower reads better than a low sprawling frame) and use Technic pins and beams for the structural skeleton, then dress it with regular bricks and slopes rather than building the whole thing from System parts. It keeps the piece count and footprint down while still giving it visual weight.
It’s also worth deciding early whether your playground is meant to be actively “in use” (minifigs on the swings, mid-climb on the frame) or a static feature of the park. Posed figures add life to a photo but commit you to a specific footprint and orientation for each piece, while an empty playground is easier to slot into a tighter space and re-arrange later if your layout changes.
🪑 Street Furniture: Benches, Fountains, and Public Art
Benches, fountains, and public art are what separate a park from an empty green rectangle. They are also cheap in parts and stud footprint, so they are worth over-investing in relative to their size.
Benches are usually built from a 1×4 or 1×6 plate for the seat, with 1×1 or 1×2 bricks angled for the backrest and simple plate or tile legs. Painting the same bench in two or three colourways and scattering them through a park reads as more realistic than repeating one identical bench.
Fountains are a genuine opportunity to show off colour and texture technique. The standard approach layers translucent blue tiles over darker bricks to fake depth, with the darkest shades pooling in the “deepest” part of the basin and lighter blues near the rim where the water would be shallower. Adding a few 1×1 translucent round plates as bubbles or spray, and angling in blue or white cheese slopes to suggest movement, sells the effect without needing SNOT water techniques. LEGO’s own 10359 Fountain Garden set (part of the Icons botanical/architecture line) is a genuinely useful reference for scale and layering if you want to study an official build before starting your own.
Public art doesn’t need to be complicated. A single sculptural piece, built from an odd mix of curved slopes, cheese pieces, or a repurposed minifig accessory scaled up, gives a park a focal point without competing with the planting or play equipment for attention.
For colour and material choices across all of this street furniture, our Landscape and terrain colour guide covers which palettes read as “natural” versus “constructed” at this scale, which is useful once you’re deciding how weathered or new your benches and paths should look.
🌳 Paths and Planting: Layout Techniques for Green Space
Paths are the connective tissue of a park, and straight paths are usually the wrong choice. Curved paths, built from a mix of plates and tiles in tan or light grey, immediately read as more park-like than a rigid grid, because they mimic how people actually walk through green space.
For planting beds, texture and colour variation matter more than piece count. A bed built from a single shade of green plate looks flat next to one that mixes:
- Base foliage in two or three greens
- A handful of flower elements in a contrasting colour
- One or two taller “shrub” builds using round bricks or cone pieces for height variation
The 2026 Botanicals line has been a genuine gift for this kind of detailing. New reshaped leaf and petal elements from recent botanical sets add colour and texture options that didn’t exist a couple of years ago, and even though those sets are designed as standalone display pieces, breaking a few apart for planting-bed detail is a well-established technique in the AFOL community.
Our Lego landscaping techniques guide goes deeper into terrain and natural-element building if you want the fuller trees-and-grass treatment beyond what fits in a formal park bed.
🏙️ Balancing Green Space Against Footprint
This is the trade-off every park build eventually forces: every stud of green space is a stud not being used for a building, road, or other city feature. There’s no universally correct ratio, but a few guidelines help.
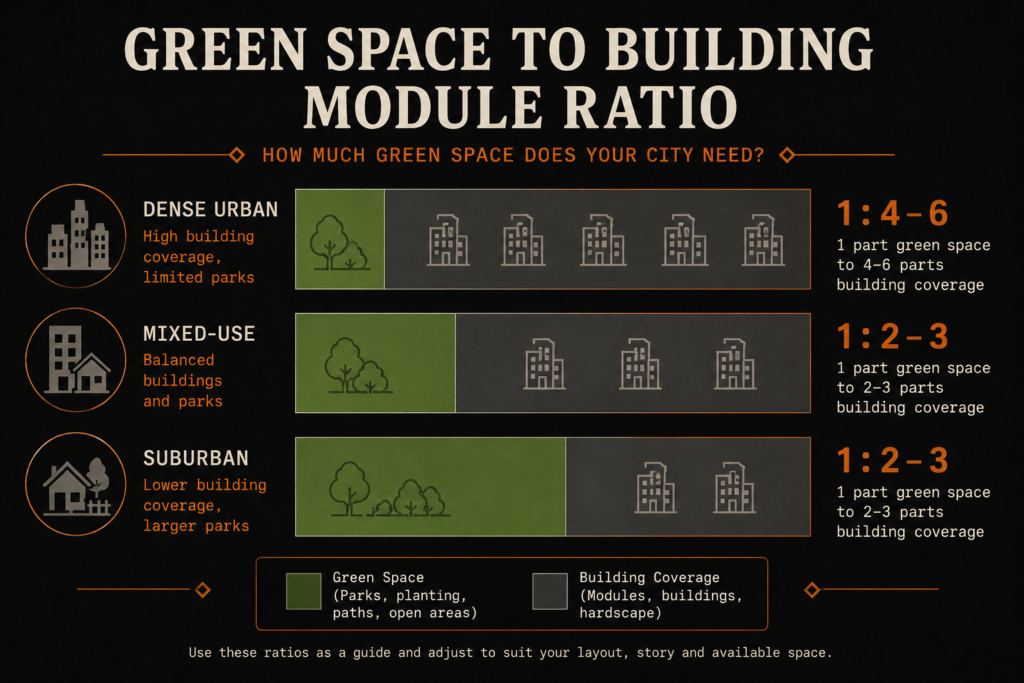
Dense urban layouts (financial districts, downtown cores) tend to read as more realistic with sparse, tightly bounded green space: a single pocket park wedged between modulars, not a sprawling lawn. Suburban or mixed-use layouts can afford more generous green space because lower building density makes room for it without the city feeling implausible.
A rule some builders use: no more than one park module for every four to six building modules in a dense district, versus one for every two to three in a lower-density layout. Treat this as a starting ratio to adjust, not a rule to follow rigidly.
Our Lego city master plan guide covers zoning and growth strategy in more depth if you’re planning green space as part of a full city layout rather than a standalone park build.
🔗 Connecting Your Park to the Rest of the City
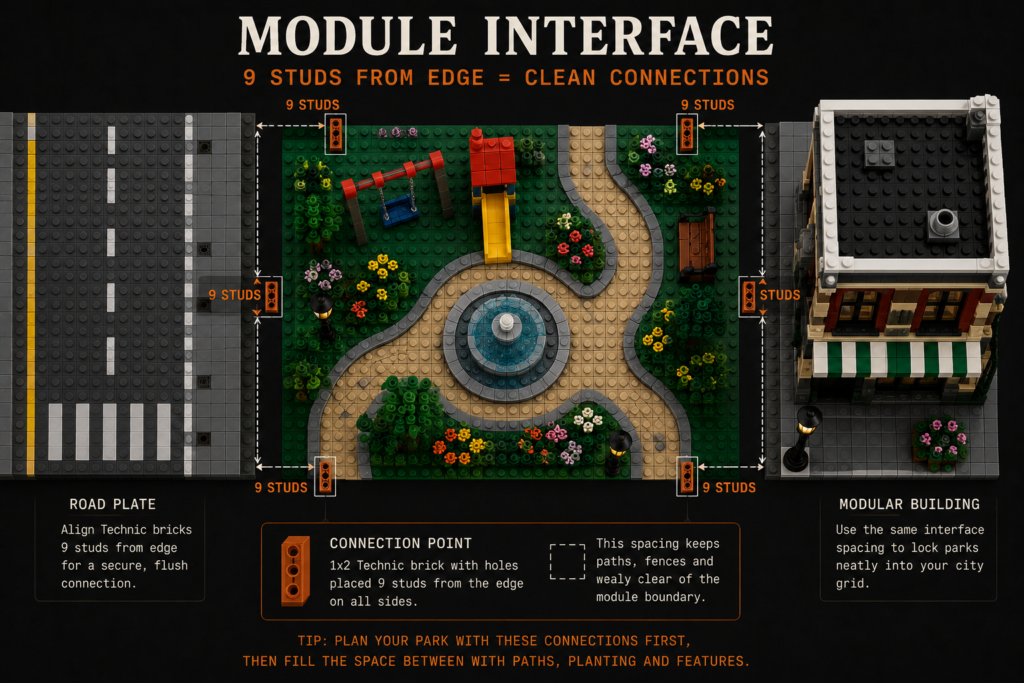
A park module is only as good as its interfaces. If it doesn’t line up with your road plates and adjacent modular buildings, it will always look like it was dropped in rather than designed in.
The unofficial AFOL modular standard is worth following even outside a formal modular buildings project: baseplates at 32 studs deep, with connection points 9 studs from the front and back edge using a Technic brick and pin on each side. Building your park module to those same connection points means it will interface cleanly with road plates and any modular building on your shelf, official or custom.
A few practical notes on the interface itself:
- Match your park’s edge treatment (kerb, path, or grass verge) to whatever borders your road plates elsewhere in the layout, so the transition doesn’t look like two different projects stitched together.
- If your park backs onto modular buildings rather than roads, leave a narrow buffer (a path or low planting strip) rather than having grass butt directly against a building’s foundation, which tends to look unfinished.
- Water features that connect to a wider canal or river system need their baseplate-edge water level to match up exactly with the neighbouring module. Our water features in Lego cities guide covers matching water levels and edge treatment across modules if your park fountain needs to tie into a larger waterway.
📐 Pocket Park vs Central Commons: Scale and Footprint Planning
Not every park needs the same footprint, and deciding which type you’re building early saves a lot of rework.
What Kind of Lego Park Should You Build?
A pocket park is a single-baseplate (or smaller) green space wedged between buildings, typically under 16×16 studs. It works best with one or two focal elements (a bench and a small planting bed, or a single sculpture) rather than trying to fit a full component list into a tight footprint. Density and restraint are the whole point.
A central commons is a multi-baseplate anchor space, often 32×32 studs or larger, built as the visual centre of a city section. This is where the full component list earns its place: playground equipment, several benches, a fountain or water feature, varied planting beds, and enough path network to make the space feel walkable rather than just green filler.
A practical way to decide: if the park is meant to be discovered while looking at the surrounding buildings, build a pocket park. If the park is meant to be the thing people look at first, build a central commons and design the surrounding modulars to face into it.
Parts budget is worth factoring in too, not just baseplate space. A convincing pocket park is achievable with a modest parts order (a bag of plates in two or three greens, a handful of flower elements, and enough tan or grey plate for a short path). A central commons with a full component list (playground, fountain, multiple benches, and varied planting) is a much bigger parts and time investment, so it’s worth treating as its own project rather than something you build in a single session alongside the rest of a city block.
There’s also a middle option worth naming: a “linear park” or green corridor that runs along a road rather than sitting in a single block. It doesn’t fit neatly into either the pocket park or central commons category, but it uses the same component techniques (paths, planting, the occasional bench) at a scale that suits a strip of green running between road plates rather than a single defined space.
Bringing It Together
A convincing Lego park is built the same way a real one is planned: as a set of interacting components, not a single showcase piece. Get the playground scale right, invest in street furniture detail out of proportion to its size, vary your planting, and make sure the whole thing actually interfaces with the road plates and buildings around it.
Whether you’re filling a gap between two modulars with a pocket park or anchoring a whole district with a central commons, the same fundamentals apply. Start with the interface, then build inward.