Flat green baseplates are out. A LEGO city or diorama that sits on a dead-flat sea of green signals “toy display” rather than “built environment,” and for adult builders who have invested serious time in architecture, minifigure detail, or modular layouts, that gap between the buildings and the base is one worth closing. Realistic landscaping is the difference between a scene that photographs well and one that genuinely stops people in their tracks.
The good news is that LEGO’s parts catalogue is surprisingly generous when it comes to organic forms. Slopes, arches, plant elements, rock moulds, and tile fragments combine into convincing terrain once you understand a handful of core principles. This guide walks through those principles and then gets specific: trees at every scale, grass and ground textures, rock formations and water, and seasonal variation options that let you refresh your display without rebuilding from scratch.
| Topic | Techniques Covered |
|---|---|
| Core principles | Organic shaping, colour variation, layering |
| Trees | Micro, minifig-scale, and large display |
| Ground textures | Grass, soil, paths, patchy coverage |
| Rock and water | Cliff faces, shorelines, strata |
| Seasonal variation | Spring/summer, autumn, winter swaps |
The Principles Behind Convincing Landscapes
Before reaching for specific parts, it helps to understand what makes natural terrain look natural rather than constructed. Three principles underpin almost every technique in this guide.
Avoid Symmetry and Straight Lines
Nature does not use a grid. The single fastest way to make a LEGO landscape feel lifeless is to arrange elements in regular rows or to run a tree line in a perfectly straight edge. Breaking up those edges, staggering heights, and varying spacing immediately reads as organic even if every individual piece is technically geometric. This is as true at microscale as it is in large display builds.
Layering is closely related. Rather than building up from baseplate level to your desired height in one jump, use intermediate plates and slopes to create gradual elevation changes. The transition from flat ground to a low hill should pass through at least two or three height steps, each with its own surface treatment.
Work With a Limited but Varied Palette
Realistic ground cover is not a single shade of green. Real grass contains multiple greens, dead patches, wet and dry areas, and seasonal variation. LEGO’s colour range gives you bright green, green, dark green, olive green, sand green, and several earth tones to work with, and mixing three or four of these in the same ground area immediately lifts the realism considerably. The key is to keep the palette limited so it reads as cohesive, while varying within that palette so it reads as natural rather than uniform.

The same principle applies to rock and soil. Light bluish grey and dark bluish grey together suggest realistic rock better than either alone. Dark tan alongside medium dark flesh creates convincing dry earth. Your colour choices will shape the entire atmosphere of the scene, so it’s worth planning them before you start building. If you’d like to go deeper on palette planning before starting your terrain, our guide to natural LEGO landscape colour selection covers the specific colour relationships that work across different terrain types.
Layer Texture From the Ground Up
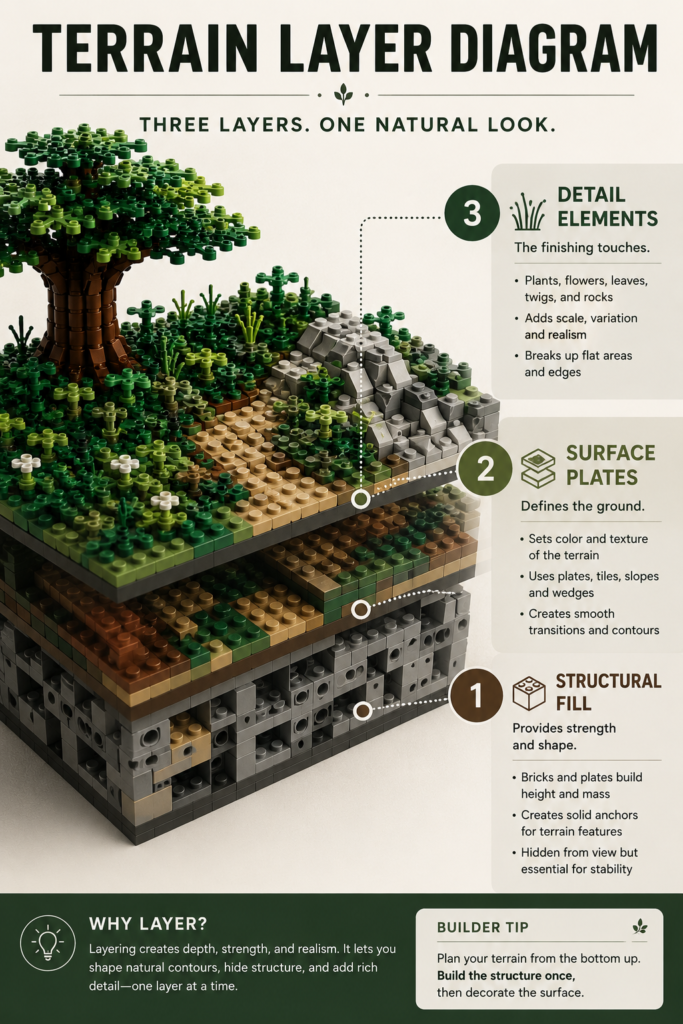
Experienced builders think of terrain as having layers: the structural fill underneath, the surface plates that define the colour and general texture, and the detail elements placed on top. Trying to do all three at once usually results in surfaces that feel flat. Building each layer deliberately, and leaving some of the structural layer visible in recessed areas, creates a more convincing sense of depth and variation.
Building Trees at Every Scale
Trees are arguably the most challenging landscaping element because they need to read correctly at different viewing distances, and because their organic branching structure is fundamentally at odds with LEGO’s rectilinear system. The solution varies depending on the scale you’re working at.
Landscaping guide
Choose your tree scale
At micro scale, the goal is readable silhouette, not botanical detail. Suggest the idea of a tree in three to five bricks and move on — the scene context does the rest of the work.
Recommended parts
Green cones (3843)
Stack 2–3 for convincing conifers
Round 1×1 brick + cheese slope
Classic micro deciduous; vary height
Travis brick
Corner cheese slopes suggest branching
1×1 round plate (dark green)
Low-profile bush or shrub filler
At minifig scale you have enough room to suggest trunk, branches, and canopy as distinct elements. Organic pose matters — a perfectly symmetrical tree reads as artificial even before the parts are identified.
Recommended parts
Bar / rod elements
Trunks; stack round bricks for bark texture
Ball joint + socket
Lets branches deviate from vertical naturally
4×4 leaf plate (2423)
Layer at different angles; overlap generously
Arch slopes (4460 / 6091)
Roots creeping over nearby rock pieces
At display scale the tree becomes an engineering project as much as a landscape element. The trunk, branching structure, and canopy are each built deliberately, and modularity makes transport and storage practical.
Recommended parts
Slopes + rock panels
SNOT trunk build; mix dark/reddish brown
Technic pins + axles
Modular branch attachment; build branches separately
Plant stems + leaf elements (assorted)
Mix sizes; taper smaller pieces to outer edges
Inverted slopes
Underside canopy texture and branch junctions
Micro-Scale Trees
At microscale, a tree needs to suggest the idea of a tree rather than accurately replicate one. Green cones stacked on a single stud work well for conifers. Round 1×1 bricks with a cheese slope on top read as small deciduous trees. Travis bricks with corner pieces can suggest branching even at tiny scales. The key at this level is silhouette: as long as the overall shape reads as “tree,” the parts used matter less than the visual impression.
Variety of height matters more at micro scale than at any other. A row of trees at exactly the same height looks like a fence. Varying the stack height by two or three plates across adjacent trees immediately creates a believable treeline.
Minifig-Scale Trees
At minifig scale you have room to suggest structure: a trunk, primary branches, and a canopy. Rods or round bricks make convincing trunks, and Technic elements can extend into simple branch structures. Hinges and ball joints are valuable here because they allow branches to deviate from the vertical plane, giving the tree a more organic pose rather than a perfectly symmetrical spread.
For the canopy, layering leaf plates at different angles and heights creates density that flat single-layer canopies cannot achieve. Overlapping pieces so the individual element edges are hidden within the mass reads far more convincingly than a canopy where every leaf plate is individually visible. Adding roots that creep over nearby rocks using slopes and arch pieces at the base of the trunk adds significant detail without much additional part count.
Large Display Trees
Large feature trees justify more complex construction. The trunk becomes a SNOT build using slopes, arches, and rock moulds to suggest bark texture and irregular surface. At this scale you can introduce colour variation into the trunk itself, mixing dark brown and reddish brown to suggest shadow and highlight on rounded surfaces.
Branches at display scale can be modular: built as separate assemblies that attach to the trunk on pins or ball joints, which also makes the build much easier to transport or store. The canopy becomes a deliberate design exercise, with multiple sizes of leaf element used together and smaller pieces placed at the outer edges to taper the volume. A dense, multi-layered canopy that partially obscures the branch structure beneath it will always read more realistically than one where the engineering is visible.
Grass, Soil, and Ground Textures
Ground cover is the element that most builders underestimate. A detailed building sitting on a plain green plate loses much of its impact. The same building sitting on layered, textured terrain immediately looks more considered and complete.
Beginner Grass Approaches
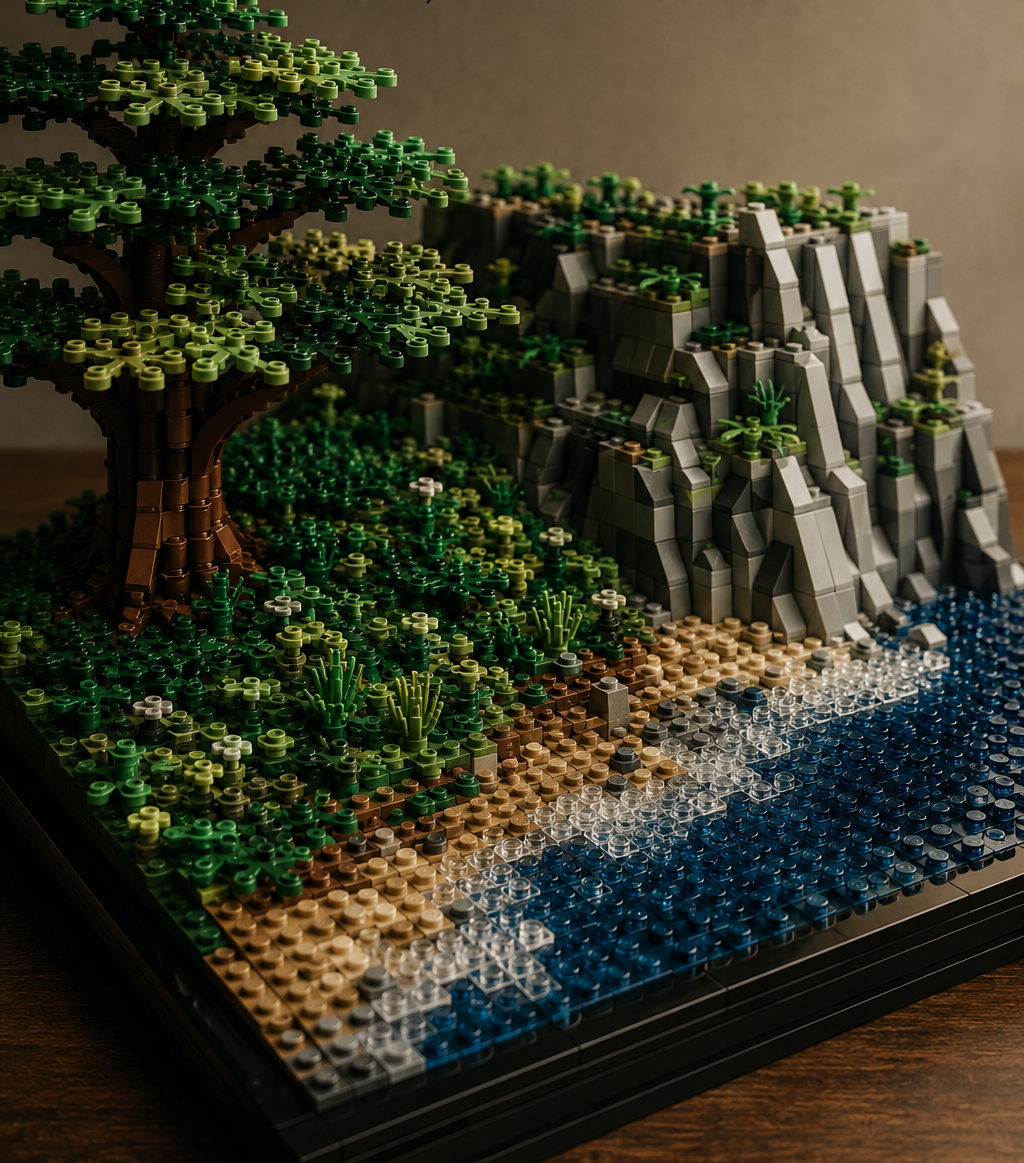
The most accessible starting point is to cover a green baseplate with grass stem elements and small plant pieces. The critical step most builders skip is introducing randomness: rotating and offsetting each piece so the field looks like it grew rather than being placed, and varying the spacing so some areas are dense while others are sparser. A perfect grid of identical grass stems is worse than no grass at all because it draws attention to the repetition.
Even at this basic level, mixing two or three different plant elements rather than using a single type creates a more convincing meadow texture.
Advanced Grass Techniques
More experienced builders treat grass as a material to build with rather than a plate to decorate. Start with a base layer of green plates in slightly varied tones, then add a second layer of smaller plates and tiles to break up the surface. Plant elements push into rod holes, tuck between studs, and layer over each other to create genuine visual density.
Clumping is more effective than even distribution. Dense concentrations of foliage separated by barer patches suggest real grass growth patterns far better than uniform coverage. Tucking small pieces into recesses and between larger elements so only their tops are visible adds a sense of depth that flat surface placement cannot achieve.
Soil, Paths, and Patchy Ground
For earth tones and path surfaces, the approach is similar: start with plates in the appropriate colour, then break up the surface with smaller pieces. Leaving occasional exposed studs suggests stones or compressed earth. Mixing slightly lighter plates as secondary colour where one plate joins another creates a natural-looking patchy effect, as though the soil varies in composition or moisture.
For transitions between grass and path, resist the temptation to make a clean edge. A gradual, irregular border where green elements encroach onto the path and earth-coloured pieces appear in the grass reads as genuinely worn and used rather than artificially maintained.
Rock Formations, Cliffs, and Water Features
Rock is one of the most satisfying LEGO terrain elements to build because LEGO’s existing rock moulds, slopes, and arch elements align naturally with real geological forms. The challenge is avoiding the uniform grey wall effect that results from stacking identical pieces.
Building Rock Faces and Cliffs
Start by blocking out the overall shape with inexpensive filler bricks or even DUPLO for large internal volumes. The visible surface is what matters, and keeping fill cheap allows you to invest in better surface pieces. Skin the structure with slopes, inverted slopes, and rock panel elements, deliberately avoiding placing the same slope type directly adjacent to itself. Variety in the facing pieces creates natural-looking surface irregularity.
Horizontal rock strata, the layered effect visible in real cliff faces, is best achieved through sideways building. Alternating bands of light bluish grey and dark bluish grey suggest sedimentary layers convincingly, and the colour change draws the eye horizontally in a way that feels geologically plausible. Breaking the strata occasionally, as though erosion has disrupted the layers, adds further realism.
Shorelines and Water
Water is one of the few LEGO textures that benefits from very subtle height variation. Stacking plates to create shallow ledges at the water’s edge suggests different depth zones and is far more convincing than a flat blue plate. Curving the shoreline rather than running it straight adds organic movement, and the curve helps break the inevitable rectangular boundary of the baseplate.
For colour, water works best in layers: a dark blue or dark turquoise base, a medium blue upper layer, and patches of transparent clear or transparent light blue at the surface edges to suggest shallow water and small waves. Dark tan plates along the immediate edge suggest wet sand or muddy riverbank. Adding small patches of green plant elements at the waterline completes the transition from water to land naturally.
Foliage on nearby rock faces deserves a specific mention: a few small plant elements tucked into the surface of an otherwise grey cliff immediately breaks up the monotony and suggests a living landscape rather than a bare mineral face.
Seasonal Variation: Swap-Out Canopies and Ground Cover
One of the most effective long-term strategies for LEGO landscape displays is designing trees and ground cover as modular systems rather than permanent structures. Building canopies as separate assemblies that attach cleanly to the trunk means you can swap them out for seasonal versions without rebuilding the underlying structure.
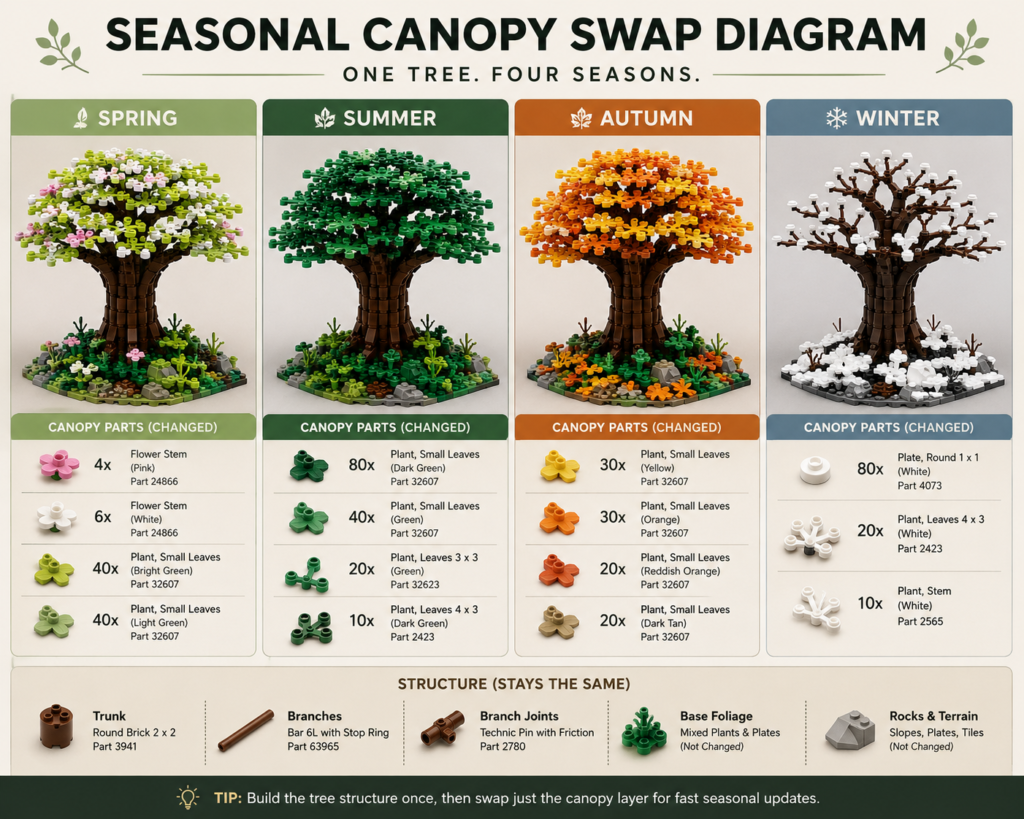
Spring and Summer
A warm-season canopy uses mixed greens: bright green, regular green, dark green, and olive green combined within the same tree give the foliage depth and shadow rather than flat uniform colour. Lighter elements at the outer edges of the canopy suggest where sunlight reaches, while darker pieces toward the centre and base suggest the shaded interior. Small flowers or white round plates scattered through ground cover suggest spring growth.
Autumn
An autumn canopy replaces or overlays green leaf elements with yellows, oranges, and reds. One of the most effective techniques is a partial colour change: keeping some green pieces at the centre while surrounding them with autumn tones suggests a tree mid-transition rather than one that has jumped instantly to full colour. This works particularly well in photographs and display contexts where the seasonal moment benefits from ambiguity.
On the ground, 1×1 plates and tiles in autumn colours scattered over the existing terrain simulate fallen leaves. Concentrating these in recesses and corners, where leaves would naturally collect, is more convincing than distributing them evenly.
Winter
A winter tree stripped back to trunk and bare branches often has more visual impact than a fully canopied version, because the structure of the build becomes visible. For trees that should appear snow-laden rather than bare, a sparse canopy using mostly white elements mixed with occasional green pieces works well without requiring a complete rebuild of the branch structure.
On the ground, white tiles and plates suggest snow drift accumulation, and placing them in the recesses of your terrain rather than flat across the whole surface gives the impression that snow has settled into low points and sheltered areas the way it actually does outdoors.
Putting It Together
The most important shift that separates effective LEGO landscaping from flat baseplate building is thinking of terrain as something you design with the same attention you give architecture. The rocks, trees, grass, and water in your scene are not background elements, they are foreground detail that shapes the entire atmosphere of the build.
Start with your core principles before reaching for parts: decide on your palette, plan where organic shapes will break your straight lines, and sketch out the layers from structural fill through to surface detail. Then work section by section, stepping back frequently to assess how individual elements read from typical viewing distance. Small adjustments to height variation, colour placement, and foliage density have outsized effects on the final impression.
Which element do you find most challenging in your own landscapes? Trees, ground cover, or rock faces? Let us know in the comments, and if you’ve developed techniques that work particularly well for you, we’d love to feature them in a future builder spotlight.
Continue Your Journey
LEGO Landscaping Techniques for Minecraft Biome Recreation — Apply these natural terrain techniques to recreating specific Minecraft biomes in brick form.
Advanced Texture Techniques for Realistic LEGO Models — Go deeper on surface texture and detail work across all types of LEGO builds.
SNOT Building Techniques: Advanced Guide for Adult Builders — Master sideways building techniques that are essential for organic terrain and rock faces.
Creating a LEGO City Master Plan: Scale, Zones, and Growth Strategy — Plan the landscape in context of your broader city layout for cohesive results.
Want landscaping ideas and building techniques delivered straight to your inbox? Subscribe to the Bricks and Blocks Creative newsletter for weekly inspiration.