Anyone can build one good townhouse. The trouble starts when you build the fourth one next to it and the whole terrace begins to look like a photocopier jammed. Real rows feel dense because they share walls, share a rhythm and still argue with each other in small ways, and that balance is surprisingly hard to reproduce in plastic.
This guide is about Lego row houses as a block-planning problem rather than a single-building problem. We will cover how to join units without losing the ability to lift them, how to pick up the brownstone look in brick, and how to plan lot widths so a block drops into your city grid cleanly. If you want the fundamentals of an individual home first, start with our guide to building Lego houses and come back.
🧱 Why Row Houses Are a Different Problem
A detached house has four faces to design. A row house has one, plus a roofline and a back wall nobody sees. That sounds easier, but the challenge shifts from construction to composition.
On a terrace, the eye reads the whole street wall before any single door. Your job is to make it feel assembled over decades by different owners, not stamped out in one afternoon.
Floor plates and stair cores are covered in our apartment buildings construction guide, so this guide sticks to what is unique to a connected row.
🔗 Party Walls and How to Join a Row
In real terraces, neighbouring houses share a structural wall, called a party wall. In Lego you have two sensible ways to represent that, and the choice affects how you store and transport the build.
Option one: separate units that butt together. Each house is its own module with a plain side wall, and the units sit side by side on the baseplate or a shared road plate. This is the easiest approach to lift, repair and rearrange. The cost is a thin seam between houses, which is actually quite believable, because real rows often show a slight joint in the brickwork.
Option two: one continuous build. You build the whole terrace as a single structure with shared interior walls, so each side wall is only one brick thick. This gives the most convincing density and the strongest result, but it is a heavy, awkward object to carry. If you go this way, plan sectional break points before you start.
My preference is a hybrid. Build the row in sections of two or three houses, with each section sharing walls internally and the section edges forming deliberate lift lines.
- Keep each section light enough to lift with two hands without flexing the middle.
- Hide the joins between sections behind a downpipe, a pilaster or a change of colour, so the seam reads as architecture.
If your row sits on a display table rather than a fixed layout, read our notes on planning a city layout with baseplates and tables before you decide how large a section can be.
🏠 Brownstone Signatures in Brick
A brownstone is a specific thing: a terraced house faced in brown sandstone, common in parts of the north-eastern United States. In Lego you are not copying the stone, you are suggesting it with colour and a handful of recognisable features. Hit enough of the signatures and the eye fills in the rest.
Here are the ones that matter most:
- The stoop. A flight of steps up to a raised front door, usually with railings. This single element does more to say brownstone than any colour choice.
- The basement or areaway entry. A sunken entrance below the stoop, often behind a small railing. It gives the facade a second layer of depth at street level.
- The cornice. A projecting band at the roofline. Stack a few inverted slopes or a row of tiles with a plate overhang to catch the shadow.
- Bay windows. Gentle projections that break the flat plane of the facade. They can be as simple as a shallow bracket arrangement or a hinged plate arrangement.
- Tall, narrow windows. Proportion is half the battle. Windows that are noticeably taller than they are wide, especially on the parlour floor, give the right formal feel.
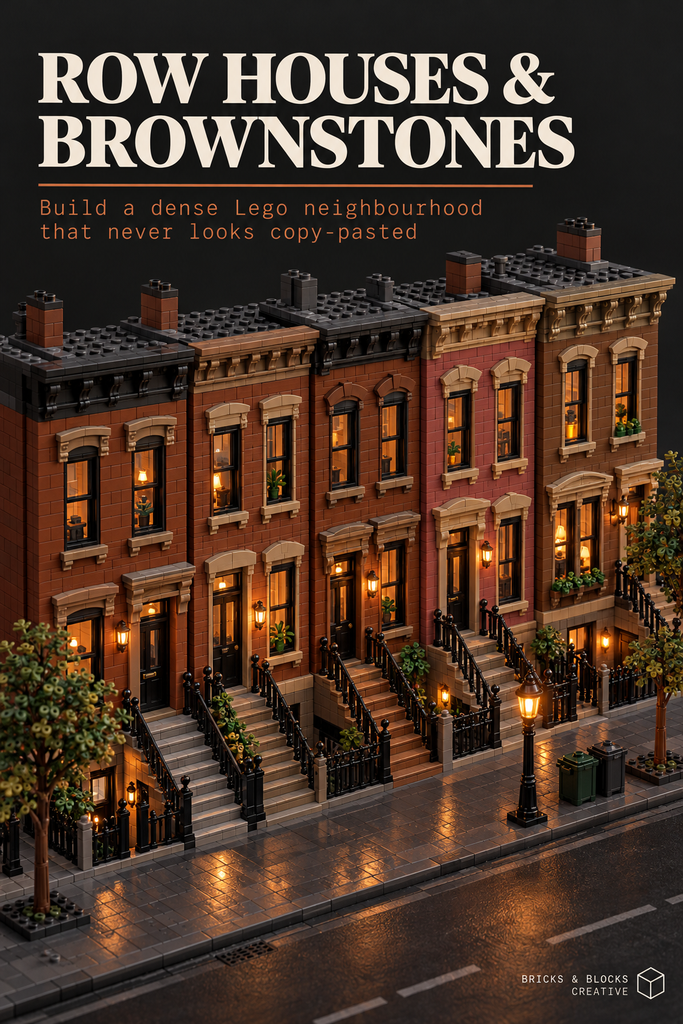
For the stoop, building it with studs-not-on-top techniques helps a lot. Our SNOT building techniques guide covers the sideways-mounting tricks that make railings, cornice detail and window frames sit flush.
🎨 The Colours That Sell the Look
Three colours do most of the work, and the names matter because sourcing parts depends on them. I checked these against a cross-reference of colour names: BrickLink lists Reddish Brown (colour ID 88), Dark Tan (ID 69) and Sand Red (ID 58). LEGO’s own naming for the same shades differs, so always search by the BrickLink name when you order.
- Reddish Brown is the safest base for a brownstone. It is warm, dark and widely available across plates, bricks, slopes and tiles.
- Dark Tan works as a trim and stonework colour. Use it for lintels, sills and cornice bands against a Reddish Brown wall.
- Sand Red is the dusty pinkish brick tone that suits a lighter, more weathered terrace. Treat it with caution: community discussion suggests it was available only briefly and mainly through service packs, so the parts range is narrow. I could not verify a current list of parts in this colour, so check BrickLink stock for each element before you commit a whole facade to it.
A practical approach is to run Reddish Brown as the dominant colour on most houses, Dark Tan for trim, and use Sand Red as an accent on one or two houses where you can source enough elements. If colour choices are new territory, our LEGO colour guide and the piece on colour matching and substitution explain how shades behave next to each other, and why batches sometimes differ.
🎶 Variation Inside Repetition
Here is the central trick. A terrace works because of what stays the same, and it comes alive because of what changes. Get the ratio wrong in either direction and it fails.
Start with the constants, which I call the datum lines. These are the horizontal lines that run unbroken along the whole row:
- The same ground floor height.
- The same cornice height, or at most a one-plate difference.
- The same stoop top level, so doors sit on a common line.
Then vary two or three elements per house, never all of them. Pick from a short list:
- Colour. Swap the main wall between Reddish Brown and Sand Red, or change the trim from Dark Tan to another neutral.
- Window pattern. One house gets a bay, the next flat sash windows, the next a pair of arched openings.
- Cornice or roofline. A simple tile cap on one, a stepped corbel on another, a dormer on a third.
The rule I follow is a rhythm of three. If houses one and three share a window pattern, make house two different, and never let two neighbours change the same element in the same way.
Do not vary the datum lines. A bay window that sits one brick lower than its neighbour reads as a mistake, while a different colour on the same line reads as a different owner.
📏 Lot Widths and Block Planning
This is the part most builders skip, and it causes most of the regret. Decide lot widths before you build a single brick, because a house built to the wrong width cannot be nudged into place later.
A caveat first: none of the figures below are official standards. They are practical guidance for minifigure-scale builds, drawn from my own planning and from community convention. The widely used modular building convention fixes depth at 32 studs and varies width in multiples of 16, which is a useful anchor even though LEGO does not publish it as a rule for custom layouts (see this overview of the modular standard).
With that in mind, here is how I think about house widths:
- 8 studs wide. A narrow, tall house. It gives a tight inner-city feel, but a stoop plus door takes up much of the frontage.
- 10 to 12 studs wide. The comfortable middle. You can fit a stoop, a door, and a bay or two windows without crowding.
- 16 studs wide. A generous townhouse. Two of these fill a standard 32-stud module neatly.

Mixing a 16-wide house between two 10-wide ones breaks up the rhythm naturally, as long as the datum lines stay level. Plan widths as a sum that fits your module, for example 12 plus 10 plus 10 for a 32-stud run.
Floor heights matter too. The same modular convention suggests floors somewhere between six and twelve bricks tall, with the ground floor usually the tallest. Make sure your window openings and stoop level match whichever figure you choose.
🗺️ Corners, Alleys, Rear Yards and the Wider Grid
A row needs ends. The corner lot is where a block earns its character, since it presents two facades to two streets. Give it a stronger feature than the mid-row houses: a chamfered corner, a shopfront, or a tower element.
Think about the following when slotting a block into a city:
- Corner lots. Wider, with entrances or windows on both elevations. Remember that the side wall is now visible and needs the same care as the front.
- Alleys. A narrow gap behind or between blocks gives you service access, bins and fire escapes, and breaks up a long wall.
- Rear yards. Behind each house, a small plot of grass, a shed or a washing line suggests life. If the back is visible from a display side, do not leave it blank.
- Street width. Your frontage looks right only if the road in front of it does. Our guide to designing realistic Lego city streets covers widths and traffic flow in detail.
Our article on creating a Lego city master plan shows how to place zones so blocks like this slot in with the right neighbours.
🌳 Street-Level Density Details
A terrace can be perfectly built and still feel empty if the pavement is bare. Density is mostly a street-level effect, so spend real effort on the strip between the front door and the kerb.
- Stoop railings. Thin bars or a pair of fences with a handrail. They add vertical rhythm that echoes your tall windows.
- Planters. Small pots on the stoop, window boxes, or a planter at the foot of the steps. Use two or three colours of greenery, not one.
- Street trees. One tree per two or three houses is a good starting point. Place them off-centre so they do not align with doors.
- Lamp posts. Space them evenly, since they are one of the few repeating elements that should stay regular.
- Bins and crates. Slightly untidy clusters near the areaway entry sell the lived-in feel.
If you want those lamp posts to actually glow, our guide to LED integration in a Lego city explains how to wire a street without ruining the look. For the green elements, landscaping techniques for trees and grass is a good companion, and a nearby pocket park gives the row somewhere to face.
🔨 Build Order, Cost and Sourcing
Build one anchor house first, usually a mid-row unit with a representative stoop, bay and cornice. Treat it as your reference for every datum line.
Once the anchor house is right, iterate: copy the structure, change two or three variables, and check each new house against the first.
A sensible order looks like this:
- Fix lot widths and datum heights on paper.
- Build the anchor house to full detail.
- Build the corner house, because it sets your end conditions.
- Fill in the mid-row houses with variations.
- Add the street furniture last, once everything is level.
Cost is the honest constraint. Reddish Brown in quantity is the main expense, and specialist parts such as bay window frames and sloped cornice pieces cost more. Order Reddish Brown in a single batch where you can, because separate orders can show slight shade differences.
Budget strategies from our post on building a Lego city on a budget apply directly here. Repeating a cheap structural method behind a more expensive facade layer is the biggest saving, and you can reuse the same inner core for every house.
Sourcing is easiest through marketplaces that let you search by colour and element, so use the BrickLink name. I did not verify live stock or pricing, so check availability on the day you order.
🏙️ Putting the Block Together
A good terrace is a quiet argument between order and individuality. The datum lines supply the order, and the two or three changes per house supply the individuality.
Plan the lots first, build one anchor house until you trust it, and keep each section liftable so the build survives moving and storage. Do that, and your row will read as a real piece of city rather than a repeated brick.