

A static LEGO city is a beautiful thing — carefully planned streets, detailed facades, a modular skyline that took months to curate. But at some point, many AFOLs hit a ceiling with static displays. The buildings look right, the infrastructure makes sense, and yet something is missing. That something, more often than not, is movement.
Powered builds transform a LEGO city from an impressive diorama into something that genuinely feels alive. A train running a continuous loop, a crane that actually lifts cargo, a fire station garage door that opens on command — these are the details that stop guests mid-sentence. This guide covers everything you need to know about introducing motion to your city layout: the technology available, the practical integration challenges, and how to approach automation without turning your build into a spaghetti mess of wires and hubs.
Understanding the Technology: Power Functions vs. Powered UP
Before you start pulling motors into your layout, it’s worth getting clear on the two distinct LEGO power ecosystems you’ll be working with — because they are not the same thing, and mixing them up creates real headaches.
Power Functions: The Legacy System
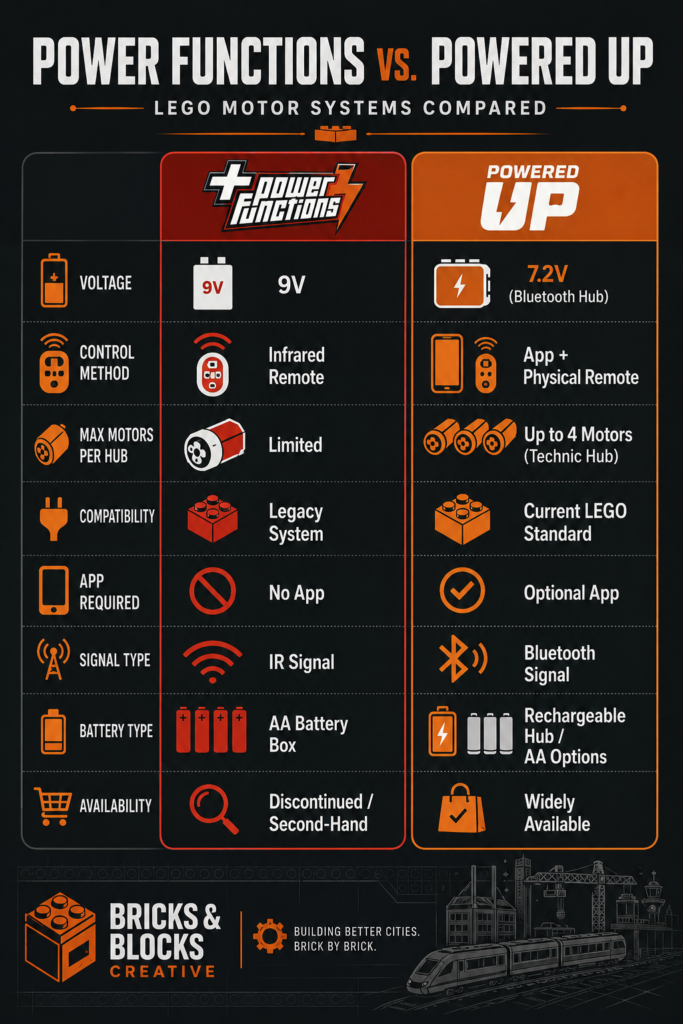
Power Functions (PF) was LEGO’s standard motorisation platform from 2006 until 2018. If you’ve picked up second-hand Technic sets or older train equipment, you’ve almost certainly encountered it: the chunky battery boxes, the bright red IR receivers, the colour-coded motor connectors. The system runs on AA batteries and controls motors via infrared remote — functional, reliable, and still widely used because there’s simply a lot of it in circulation.
The key limitation of Power Functions is line-of-sight IR control. The remote needs a clear path to the receiver, which becomes genuinely annoying when your layout has buildings blocking the signal. That said, PF motors remain excellent for anything you want to run continuously and simply — the kind of application where you set it going and leave it.
Powered UP: The Modern System
Powered UP replaced Power Functions as the current standard and addresses most of PF’s frustrations. The system runs on Bluetooth rather than infrared, which means walls, buildings, and module edges are no longer obstacles. Hubs — the small central units that house the battery and connect your motors — communicate wirelessly with the official LEGO app or compatible third-party software.
Powered UP hubs come in several variants. The standard hub ships with many City sets and supports basic motor control and lighting. The Technic Hub — included in flagship Technic sets — is more capable, supporting up to four motor connections simultaneously and offering greater precision control. The MOVE Hub (common in BOOST sets) adds a built-in colour sensor and is less relevant for city builds specifically.
For a LEGO city with serious automation ambitions, the Technic Hub is generally the better choice. It handles multiple motors without the latency issues you can encounter running several motors from a single standard hub.
Trains: The Natural Starting Point
For most builders, motorised trains are the entry point into powered LEGO. The trains sell themselves — they run a visible circuit, they create atmosphere, and LEGO’s official City train sets already come with Powered UP motors and a hub installed. The Freight Train (60336) is a well-regarded example: the locomotive contains an integrated Powered UP motor connected to a Technic-style driven axle, and the whole thing is controlled via the LEGO app. For builders starting out, this is the lowest-friction path to motion.
Going Further with Track Automation
Once you’ve got a train running, the temptation is to add more — a second train, point-to-point switching, automated signals. This is where things get genuinely interesting and also considerably more complex. Third-party solutions have emerged specifically for LEGO train automation: sensor-based stop-and-go systems, Bluetooth multi-train control software, and community-designed track sensor integrations that allow collision-free operation of two trains on a shared continuous track.
The key principle for multi-train layouts is buffer management. Rather than trying to control both trains simultaneously from a single app, experienced builders typically run each train from its own hub, then use automation software — often BrickController2 or the Powered UP third-party API — to coordinate timing across hubs. Trains can be programmed to pause at a designated station, restart after a delay, and maintain sufficient separation to prevent pile-ups.
If you’re building from scratch and planning a serious train circuit, a well-considered transit network plan from the outset will save you significant rework later. The track radius constraints of LEGO rail mean that where your tracks can go directly influences where your buildings and streets can go, so plan these together.
Adding Motion to Buildings: Cranes, Elevators, and Garage Doors
Trains are the headline act, but the most architecturally interesting applications of LEGO motors are in building features. A container crane that rotates 360° and raises a load, a car park elevator that descends into a below-ground garage, a drawbridge that opens over your river section — these create moments of genuine surprise in a layout.
Container Cranes and Construction Equipment
A working container crane is one of the more complex projects you can take on, but the results are consistently impressive. A serious crane build typically requires four motors: one for slew (rotation), one for the trolley (traversal along the boom), one for the hook winch (raising and lowering), and one for travel if you want the crane to move along rails. Running four motors simultaneously requires careful hub management — the Technic Hub’s four-port design makes it the natural choice here.
Community MOC designers on Rebrickable have documented multiple approaches to crane builds, and studying these before planning your own is time well spent. The structural challenge is that LEGO cranes need to be rigid enough to lift load without flexing the boom — a problem that Technic beams and cross-connectors solve well, but which requires deliberate design rather than improvisation.
Elevators and Vertical Movement
Building elevators into a city structure is a surprisingly accessible project once you’ve worked with motors a few times. A small DC motor connected to a Technic worm gear creates a reliable linear actuator for a simple lift platform. The worm gear is load-holding by nature — it won’t back-drive under gravity — which means your elevator stays at whatever floor it last stopped at, rather than sliding back down the moment power is cut.
For multi-storey buildings where an elevator would genuinely cross floors, the challenge is alignment: the shaft needs to be precisely built so the platform doesn’t bind. This usually means Technic brick construction for the shaft rather than System bricks, at least for the structural elements.
Moving Facades and Street Features
Smaller-scale moving features often have the highest visual impact per unit of effort. A garage door driven by a worm gear and small motor, a shop awning that extends via a linear actuator, a lighthouse with a rotating light assembly — these are achievable in a weekend once you’ve got the basics of motor integration understood.
The LEGO Powered UP system includes LED light elements that can be controlled through the same hub as your motors. For a lighthouse or a controlled street lighting effect that syncs with your train’s arrival, a single hub can manage both the light and the motor, simplifying your wiring significantly.
Power Distribution Across Large Layouts
The most consistently underestimated challenge in a large powered city isn’t the motors themselves — it’s power supply and wiring management. A layout with two trains, a crane, and several building features can easily have five or six separate hubs, each requiring its own battery pack. Swapping out AA batteries across a dozen battery boxes is not how you want to spend your display time.
Mains Power Solutions
For permanent or semi-permanent layouts, converting LEGO hubs to mains power is the pragmatic solution most serious builders eventually adopt. Third-party power adapters are available that replicate the output of LEGO’s standard battery boxes, allowing you to run cables from a mains adapter under the module to a hub tucked into the building or terrain.
This requires basic electrical safety awareness — you’re running mains-derived power into a LEGO hub, and while the adapters are low-voltage DC at the hub end, the mains transformer itself should be a quality unit rather than the cheapest option available. Many builders use powered USB hubs with appropriate output adapters for simpler setups, particularly for lighting applications.
Cabling Strategies and Concealment
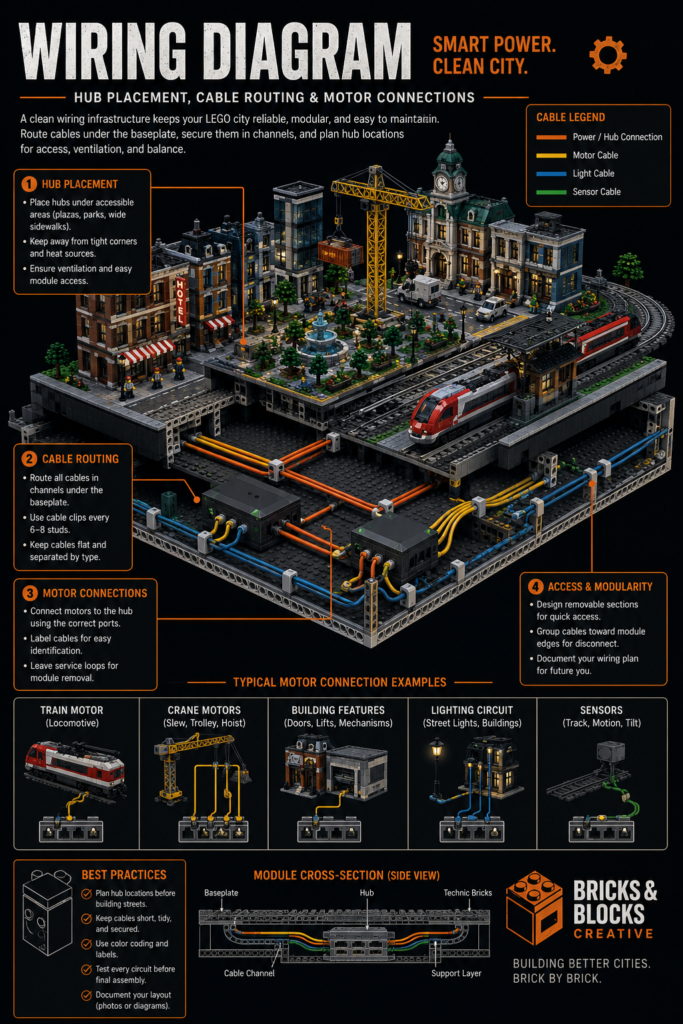
LEGO cities generate a lot of cable — motor cables, LED cables, hub charging cables — and managing this tidily is genuinely part of the craft. The standard approach is to route all cabling under the modules before the buildings go on top. This means planning your cable paths at the baseplate stage, not as an afterthought.
One technique that works well on modular builds is to plan the foundations and below-ground infrastructure as a deliberate part of the layout design. This means leaving deliberate channels through baseplates for cabling, building sub-platforms under building modules to create a hidden service layer, and treating hub placement with the same care you give to visible architecture.
JST-style quick-connect plugs — not LEGO parts, but widely available from electronics suppliers — allow you to build modular cable runs that disconnect cleanly when you want to rearrange modules. This is worth the minor extra cost if your layout is the kind that grows and changes over time.
Integrating Technic Into System Builds
The aesthetic challenge of powered LEGO city builds is significant: Technic components look like Technic components, and they don’t naturally blend into a City-scale streetscape. Getting motion into a System brick building without Technic elements visibly intruding on the design takes planning.
The most common approach is strict separation between the mechanical core and the visible skin. The motor and gearing sit inside the building structure — accessible through a removable back or roof panel — while the exterior maintains a conventional System brick look. This is how the official LEGO modular buildings handle the occasional moving part, and it’s the right model to follow.
Understanding the fundamental differences in how Technic and System bricks work together pays dividends specifically here. Technic elements attach to System bricks in ways that aren’t always obvious, and knowing your connection options before you start designing a mechanism prevents situations where you’ve built an excellent motor assembly that doesn’t actually fit inside the building you intended.
For vehicles — motorised buses, bin lorries with working hydraulics, cars with actual driven wheels — the concealment challenge is less severe because the vehicle itself is largely Technic by necessity. The art is in the bodywork, wrapping a compelling System-brick exterior around a Technic drivetrain. This is exactly what LEGO’s own City vehicles do, and studying official sets in this regard is always instructive.
Planning a Powered Layout from the Start
If you’re beginning a city layout with the intention of including powered elements from the outset, the planning approach differs from a static build in a few important ways.
Infrastructure First
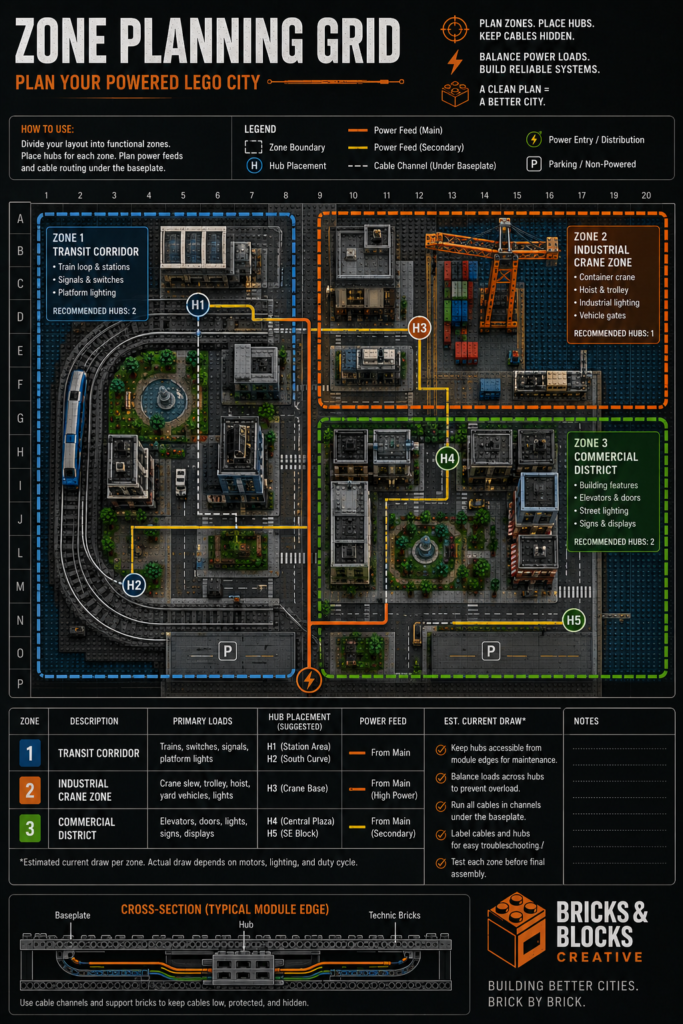
Your electrical infrastructure decisions — where hubs will sit, how power reaches them, how cables route between modules — should be made before buildings go up, not afterwards. This is the single lesson that experienced powered builders cite most often. Retrofitting wiring into an existing build is miserable. Planning it in from the start is surprisingly straightforward.
Think about hub access as you would think about access panels in real architecture: you need to be able to reach a hub to replace batteries, update firmware, or troubleshoot a motor connection. A hub tucked under a building with removable rooftops or a lift-off upper storey is accessible. A hub buried under a street grid with fixed buildings over it is a problem.
Modular Design and Motion
Modular construction and powered builds are natural allies. When each module is a self-contained unit with its own hub and internal cabling, you can move, swap, and reconfigure modules without untangling a single master cable loom. Your layout needs a coherent city master plan regardless of whether you’re adding motion, but a powered build makes that planning even more valuable.
Define zones in your layout — industrial areas likely to have cranes and working machinery, a transit corridor for the train, a commercial district where a tram might run — and design your power infrastructure around those zones. Each zone can have its own hub and power feed, creating a manageable, fault-tolerant setup rather than a single point of failure.
Building Your Parts Inventory
Motorised builds require different parts than static ones, and the parts that matter most here aren’t always easy to source. Powered UP components — hubs, motors, sensor elements — are primarily available through official LEGO sets and the Pick-a-Brick service. The L Motor (88003) and the Technic XL Motor (88014) are the most useful general-purpose motors for city applications, covering everything from train propulsion to crane winches.
Before budgeting for a powered build, building out your core city parts inventory with structural and System elements first gives you the foundation that the Technic and Powered UP components will attach to. Skimping on basic brick quantity to fund motors tends to produce underdeveloped cityscape with impressive mechanisms floating in it — the opposite of what you want.
Practical Starting Points: Where to Begin
The range of possible powered additions to a LEGO city can feel paralysing if you’re trying to plan everything at once. A more productive approach is to choose a single, self-contained project, see it through to working completion, and then build from there.
A motorised train on a simple oval of track is the classic starting point for good reason: it’s achievable in a weekend, the official LEGO components are reliable, and the result is immediately visible and impressive. Once you’ve managed one hub, one motor, and one app-controlled function, the mental model for more complex builds is established.
Powered UP motor reference
Train Motor
88011
Torque
Low
Speed
High
Ideal uses
Found in
City Freight Train (60336), Passenger Train (60197)
L Motor
88003
Torque
Medium
Speed
Medium
Ideal uses
Found in
Pick-a-Brick, BOOST sets, standalone
XL Motor
88014
Torque
High
Speed
Low
Ideal uses
Found in
Technic flagship sets, Pick-a-Brick, standalone
Linear Actuator
45002 / 88013
Torque
Very high
Speed
Very low
Ideal uses
Found in
Technic construction sets, SPIKE Prime
From there, a single motorised building feature — a garage door, a crane hook, a drawbridge — introduces the integration challenges of embedding motion in architecture without the complexity of a multi-motor setup. Each project builds your understanding of gearing, torque, cable management, and spatial planning.
The builders producing the most impressive powered city content — the multi-train layouts with automated switching, the fully operational cranes, the motorised modulars — have almost universally arrived there through iteration rather than a single ambitious build. Start modest, finish it properly, and let the ambition grow.
Conclusion
Motion transforms what a LEGO city can be. A working train, a functional crane, a building with a genuinely opening door — these aren’t just impressive technical achievements, they change how people experience a layout. They’re also deeply satisfying to design and build in a way that static construction, for all its pleasures, doesn’t quite replicate.
The technology is more accessible than it’s ever been. Powered UP’s Bluetooth control removes the line-of-sight frustrations of the old IR system. Community-developed software has opened multi-train automation to builders who aren’t programmers. And decades of Technic development have produced a motor and gearing ecosystem that can handle almost anything a city builder wants to put in motion.
The investment is real — in parts, in planning, and in the patience required to get mechanisms working reliably — but the result is a layout that genuinely earns the extra effort. If you’ve been thinking about adding motion to your city, this is the guide to start with. Now build something that moves.
Continue Your Journey
- Building a LEGO City Transit System: Buses, Trains, and Subways — comprehensive coverage of motorised and non-motorised transit options for your layout
- Technic vs. System: Choosing the Right Lego Approach — understanding how to integrate Technic elements without compromising your city’s aesthetic
- Lighting Your Lego City: Complete Guide to LED Integration — the companion guide to powered features, covering LEGO’s LED ecosystem and mains power solutions
- Creating a Lego City Master Plan: Scale, Zones, and Growth Strategy — planning your layout for long-term growth, including infrastructure for powered builds
- Planning Your Lego City Layout: Baseplates, Tables, and Display Solutions — the structural and display foundation every powered city layout needs
Want more content like this? Sign up to the Bricks & Blocks Creative newsletter for guides, news, and building inspiration delivered directly to your inbox.
What powered feature are you most interested in adding to your layout — trains, working building mechanisms, or something else entirely? Let us know in the comments.


