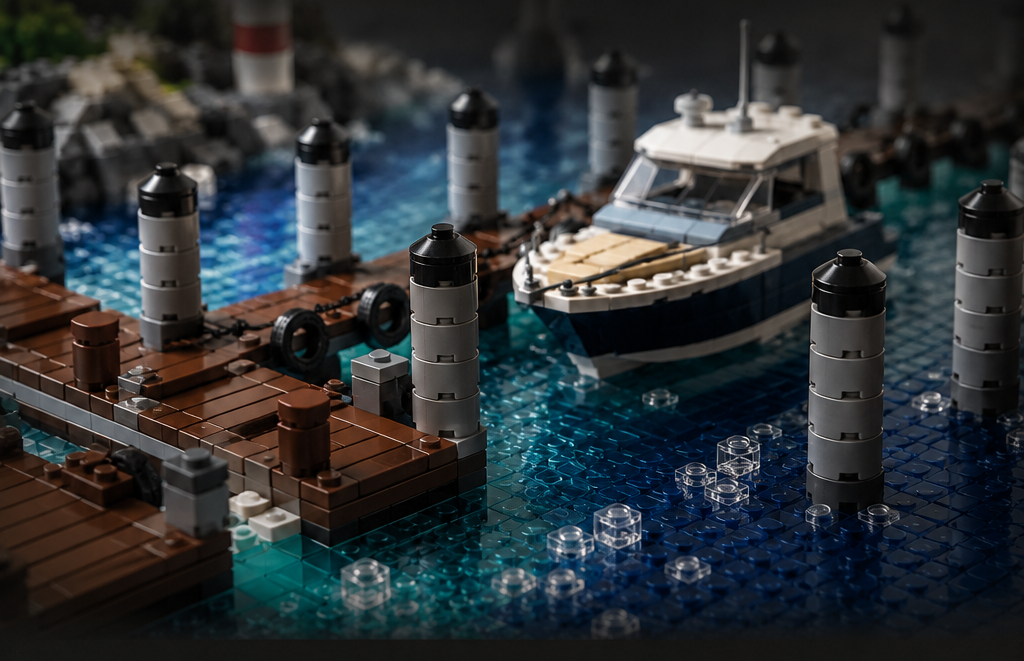
A LEGO city without water usually looks finished but never quite alive. Add a river cutting through the middle, a canal lined with modulars, or a working marina, and the same collection of buildings suddenly reads as a real place with a reason for its layout. Water gives a city an edge to build toward and a reason for bridges, boardwalks, and docks to exist in the first place.
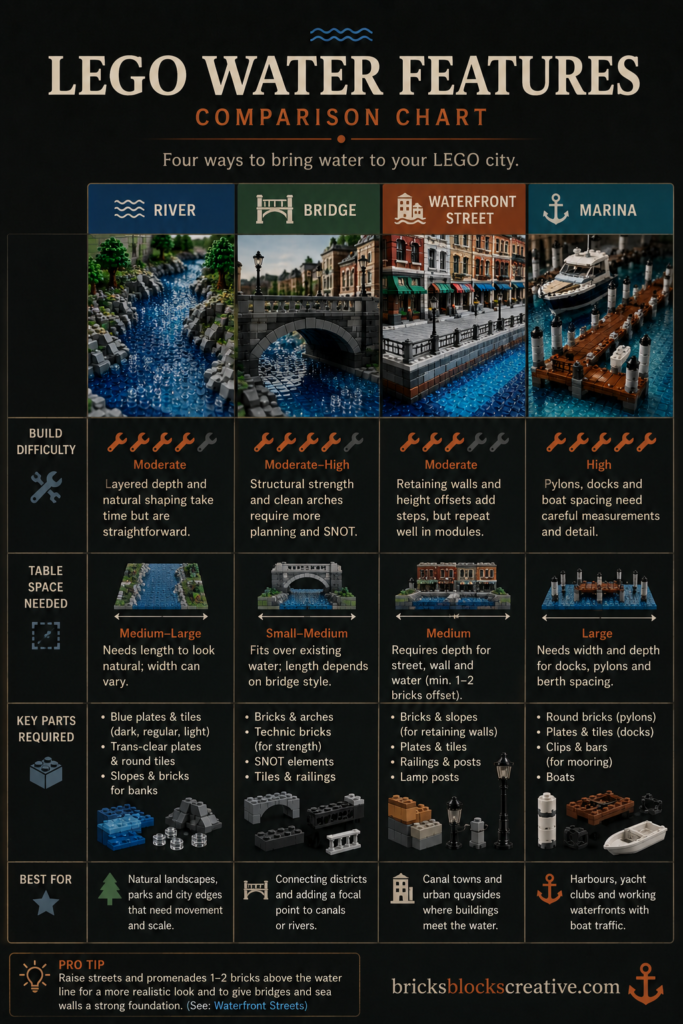
This guide walks through the four techniques that come up most when AFOLs start adding water to a custom city: building water that actually looks like it moves, bridging it well, integrating waterfront properties without them looking like they are drowning, and building marinas that hold up to close inspection. There is also a section on smaller water features for anyone working with limited table space.
Building Rivers and Canals That Actually Look Like Water
The biggest giveaway of a beginner water build is a single flat layer of blue plates. Real rivers have depth, movement, and colour variation, and getting those three things into a LEGO build is mostly a question of layering rather than any exotic parts.
Layering for Depth
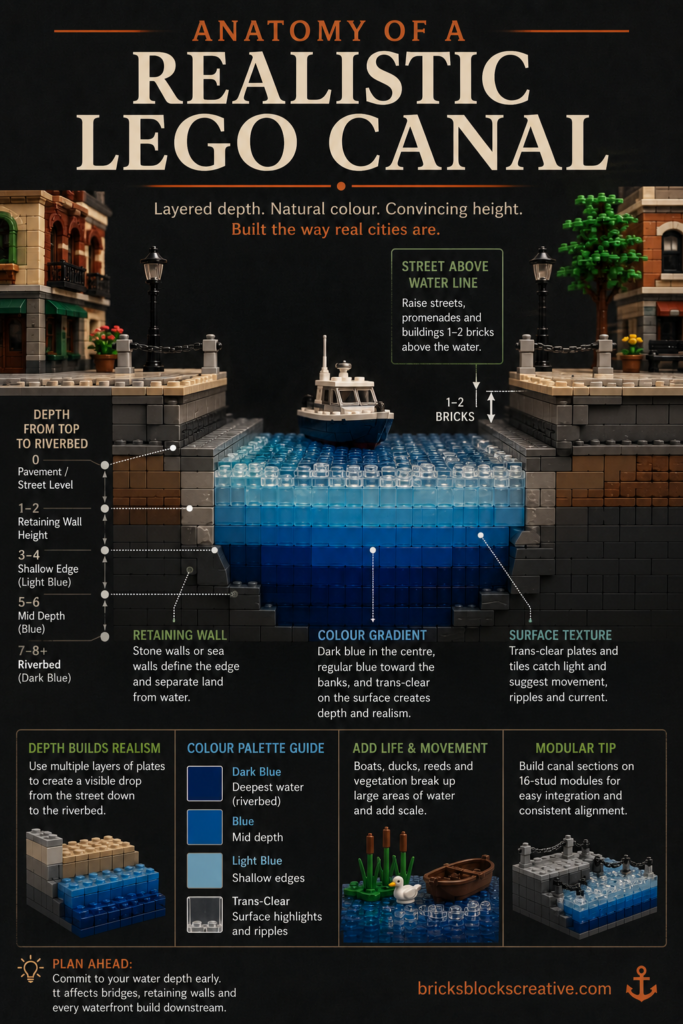
Most convincing canal and river builds use several bricks of depth in the water itself, so there is a visible drop from the pavement down to the riverbed rather than water sitting flush with the street. A dark blue base a few plates down, built up in stages toward the edges, gives the impression of a channel rather than a puddle. This is also the moment to plan your LEGO city master plan around the water rather than dropping a river in as an afterthought, since the depth you commit to early affects every bridge and retaining wall downstream.
Colour and Texture Tricks
Dark blue at the centre, regular blue toward the banks, and a scattering of trans-clear plates or tiles on top is close to the standard palette AFOLs reach for when they want a sense of current. The trans-clear pieces catch light differently to the solid blue underneath them, which does a lot of the work of suggesting movement without any actual motion. Studs-on-top sections with round trans-clear plates arranged in loose swirls can suggest a slow eddy or a spot where the current bends around a support.
Breaking Up Flat Water
Large open stretches of water can still look static even with good layering, so most builders add small distractions on the surface. A couple of minifigure boats, a scattering of ducks, or reeds and small vegetation along the banks all break up the eye’s read of a flat plane. If you have already worked through LEGO landscaping techniques for trees and terrain elsewhere in your city, the same layering logic applies here, just with water instead of grass.
Bridges That Earn Their Keep
A river or canal is only interesting if something has to cross it, and bridges are one of the more satisfying builds in a waterfront city because they combine structure with visible personality.
Simple Beam Bridges
For anyone new to bridge building, or for the smaller, quieter corners of a city, a beam bridge built from standard bricks across two piers is the easiest place to start. These do not need any specialised parts, hold their shape well, and can be dressed up later with railings and lamp posts once the basic structure is solid.
Arches and SNOT Details
Arch bridges built from curved slopes give a canal a more historic or European feel, and they read especially well over narrower channels where the arch shape is fully visible above the water line. Getting the underside of the arch clean usually means leaning on SNOT building techniques, since studs-not-on-top assembly is what lets the curve sit smoothly instead of looking blocky from below.
Multi-Support Bridges for Taller Boats
If your marina or dock plans include taller boats, a single low beam bridge will block them, so a multi-support “staircase” bridge that steps up toward the centre span solves the clearance problem while still looking intentional. These work particularly well on the kind of raised, Venetian-style canal builds where the walkways already sit above the water line, since the bridge just continues that existing height change.
Making Waterfront Streets Feel Like Waterfront Streets
The most common mistake in waterfront city sections is building houses flush with the water, which makes them look like they are sitting in the river rather than beside it.
Raising the City Above the Water Line
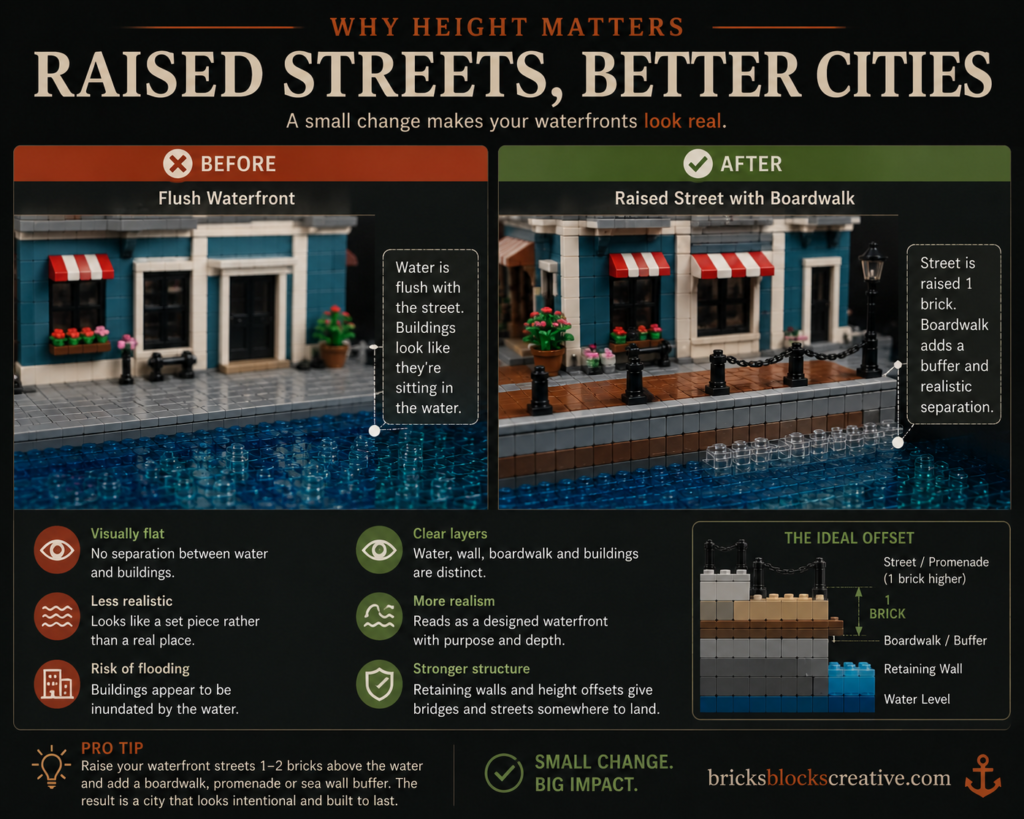
Most convincing canal cities raise the pavement, promenade, or street level one to two bricks above the water itself. That small change does two things at once: it gives bridges and retaining walls somewhere real to land, and it stops the buildings from visually merging into the water below them. This is a good point to revisit your approach to LEGO city streets, since a waterfront street usually needs a slightly different width and camber than an inland one to accommodate the extra height change.
Retaining Walls and Sea Walls
A stepped or sloped retaining wall between the raised street and the water does a lot of quiet work. Colour gradients from tan through to a darker nougat or reddish brown are a common way to suggest a stone or brick sea wall without it looking like a single flat colour block, and a section built on a 16-stud module with a mix of plates and support clips gives a rusted, industrial waterfront feel if that suits your city’s theme better than a clean stone quay.
Beaches and Boardwalks as Buffers
Where a full retaining wall feels too heavy for the scene, a beach or boardwalk works as a softer buffer between buildings and water. A gentle colour gradient from tan to a lighter sand tone in front of a row of houses reads as a natural shoreline, while a simple boardwalk of tan or brown tiles achieves the same separation with a more built-up feel. Either option keeps the water from looking like it is lapping directly at someone’s front door.
What’s Your LEGO Waterfront Style?
Answer five quick questions to find out which water feature you should build next.
Marinas and Docks That Hold Up to Scrutiny
Docks and marinas are where waterfront building gets genuinely technical, since the goal is something that looks thin and delicate while still holding boats securely in place.
Pylons, Jumpers, and Half-Stud Offsets
Jumper plates are the standard trick for getting a half-stud offset, which lets pylons and supports sit slightly narrower than a full stud width and immediately look less chunky. Round bricks and bar-and-clip assemblies used as pylons give piers that thin, slightly irregular look of real wooden or metal dock supports, rather than the uniform look of stacked standard bricks.
Spacing Berths and Piers
Consistency matters more than any individual clever technique here. Spacing pylons roughly five studs apart along a pier, with about four studs between the pier and the retaining wall, keeps boat berths even and gives the whole structure a planned, rather than improvised, feel. If you are building your marina as part of a larger LEGO city layout shared with other builders or displayed at events, agreeing this kind of spacing in advance means everyone’s dock modules can connect cleanly.
Starting From an Official Set
Official LEGO marina and harbour sets are a reasonable starting point if you would rather modify something proven than design pylons from scratch. Treat the set as the base module, then extend the quay, add extra berths, and blend the colours into your existing waterfront rather than leaving it as an obviously separate piece. Checking your LEGO piece inventory before you start extending is worth doing, since dock and pylon parts tend to be ones builders run short of first.
Beyond the Basics: Height and Small Spaces
Two techniques are worth knowing even if they are not the first thing most people build.
Raising sections of your canal and street network onto different levels, connected by short staircases and small bridges, adds real visual drama to a waterfront district and mirrors what Venetian-style canal cities do with their walkways. If your city already includes underground detail from a guide like building below ground, a raised waterfront gives you a matching sense of verticality above street level too.
At the other end of the scale, a small fountain or pocket pond is a good way to bring water into a courtyard, park, or plaza corner without committing to a full canal system. A dark blue core topped with a thin layer of trans-clear tiles gives a shallow, still-water look that suits a small basin far better than the deeper layering used for a river.
Building Your Own Waterfront
None of these techniques need to be used all at once. A single canal with one well-built bridge and a raised street is already a step up from flat blue plates, and marinas, retaining walls, and multi-level canals can all be added later as your city grows. If you are still working out how ambitious to be with a project like this, it is worth checking a realistic LEGO city building timeline before committing to a full waterfront district in one go.
Start with whichever piece of your city already touches water, whether that is a bridge you have been putting off or a stretch of waterfront that currently looks flat, and build from there.
Continue Your Journey
- Creating a LEGO City Master Plan: Scale, Zones, and Growth Strategy
- Designing Realistic LEGO City Streets: Width, Patterns, and Traffic Flow
- LEGO Landscaping Techniques: Trees, Grass, and Natural Terrain
- SNOT Building Techniques: Advanced Guide for Adult Builders
- Planning Your Lego City Layout: Baseplates, Tables, and Display Solutions
Which part of your city’s waterfront are you tackling first, the canal itself, the bridges, or the marina? Let us know in the comments.