Advanced Mountain Techniques
Here’s where you can really make your mountains shine. Add natural features like cave entrances at various elevations. These don’t need to be massive – sometimes a small dark opening is more interesting than a giant cavern entrance.
Waterfalls cascading down mountainsides look incredible and they’re easier to build than you’d think. Find a natural-looking spot on a cliff face, create a small pool at the top, and let the water flow down. Use stone variants and some vegetation around the water source to make it look like a natural spring.
Speaking of vegetation, don’t put trees randomly on your mountain. Plants grow where conditions are right. Lower elevations might have full trees, mid-elevations have smaller trees and shrubs, and above a certain height it’s just rock and maybe some grass. This elevation-based vegetation is one of those details that makes terrain feel professional.
Crevices and rock formations add amazing detail. A few strategically placed boulders near the peak, some cracks in the rock face, maybe a small plateau partway up – these little touches bring mountains to life.
Designing Flowing Water Features
Water features can make or break a landscape. A well-designed river adds so much life to terrain. A poorly designed one looks like someone just dug a ditch and filled it with water.
River Path Planning
Rivers follow the path of least resistance from high elevation to low. That’s the golden rule. If you’re putting a river on your landscape, figure out where the high ground is (maybe that mountain you just built) and let the water flow naturally downward.
Real rivers aren’t straight. They meander and curve because water erodes the outside banks of curves and deposits sediment on the inside banks. Your river should wind naturally through the landscape. Make some curves gentle and others sharper.
Width and depth should vary throughout the river’s course. Rivers are typically narrower and shallower at their source, wider and deeper as they flow downstream. Add some narrow sections where the river speeds up, wider sections where it slows down and spreads out.
If you want to get fancy, add tributaries – smaller streams that flow into your main river. These should follow the same rules: flowing from high to low, with natural curves.
Riverbed Construction
This is one of those details most people skip, and it shows. A good riverbed has depth variation. Shallow areas near the banks, deeper channels in the middle. Use gravel, sand, and clay to create the riverbed. Gravel in the shallow, fast-moving sections. Sand in the slower sections. Clay where water might deposit fine sediments.
The banks of your river need to look eroded. Use stairs and slabs to create gentle slopes from the water to the land. Add some exposed roots if you’ve got trees nearby (use dark oak fence pieces). Throw in some vegetation – tall grass, flowers, maybe some sugar cane.
Water mechanics in Minecraft can be tricky. Remember that water only flows seven blocks from a source block before it stops. For a river, place source blocks every eight blocks to keep it flowing properly. You can hide this by varying the riverbed depth – source blocks in the deeper sections are less noticeable.
Special Features
Waterfalls are river features you absolutely need to master. They work best where there’s a natural elevation change. The key is making the drop feel natural – not just a straight cliff of water, but maybe some rocks the water flows around, some splash at the bottom, a pool where the water lands.
For small cascades and rapids, use partial blocks like stairs and slabs in the riverbed. This creates the appearance of water flowing over rocks. Add some stone boulders poking out of the water in fast-moving sections.
If your river is flowing to an ocean or large lake, create a proper delta where it meets the larger water body. The river should widen and split into smaller channels. Add some sand bars and shallow areas where sediment would naturally deposit.
Building Natural Forests and Woodlands
Forests might seem easy – just plant a bunch of trees, right? Well, sort of. But there’s a huge difference between a bunch of trees and a convincing forest.
Forest Composition Basics
Density is the first thing to consider. Is this a dense forest where you can barely see the sky? A moderate woodland with clear paths through it? Or a sparse grove where trees are spread out? Each type has a different feel and serves different purposes in your landscape.
Don’t just use default trees. Minecraft’s natural generation is okay, but custom trees look so much better. Vary the trunk thickness – not every tree should be one block wide. Some trees are taller, some shorter, some with spreading branches, others that grow straight up.
The forest floor is where a lot of people drop the ball. It shouldn’t be flat grass with trees on it. Add leaf litter (carpet blocks work great for this), mushrooms, flowers, patches of coarse dirt, fallen logs made from sideways logs and stairs. Make it look lived-in.
And please, create natural edges. Forests don’t just stop at a hard line. They thin out gradually with smaller trees and bushes at the edges.
Custom Tree Building
This is where your forest goes from good to great. Building custom trees isn’t hard, it just takes some observation of real trees.
Start with the trunk. Vary the thickness as it goes up – trees are wider at the base. Use different wood types together if you want bark texture variation. Add some moss or vines to older trees.
For the canopy, think about how light filters through leaves. Don’t make it a solid blob. Create gaps and variations in density. Some branches should extend further than others. Use leaf blocks but also incorporate some fences or walls for branch structure that’s visible.
Large trees can have exposed root systems. Use upside-down stairs and slabs around the base to create roots spreading out. It’s a small detail that makes trees feel anchored to the ground.
Forest Floor Details
This is where your forest gets personality. Scatter some fallen logs using sideways log blocks. These should be partially covered by the forest floor, maybe with some mushrooms growing on them.
Rock outcroppings make sense in forests. Not huge boulders necessarily, just some stones poking through the forest floor here and there.
Create natural clearings with purpose. Maybe there’s a ring of mushrooms (fairy ring), maybe there’s a small pond or stream running through, maybe it’s just a spot where a big tree fell and let light in.
If you want to add environmental storytelling, throw in signs of habitation without making it feel artificial. An old campfire ring, an abandoned mineshaft entrance (connecting to survival mode gameplay), or a hidden woodland structure.
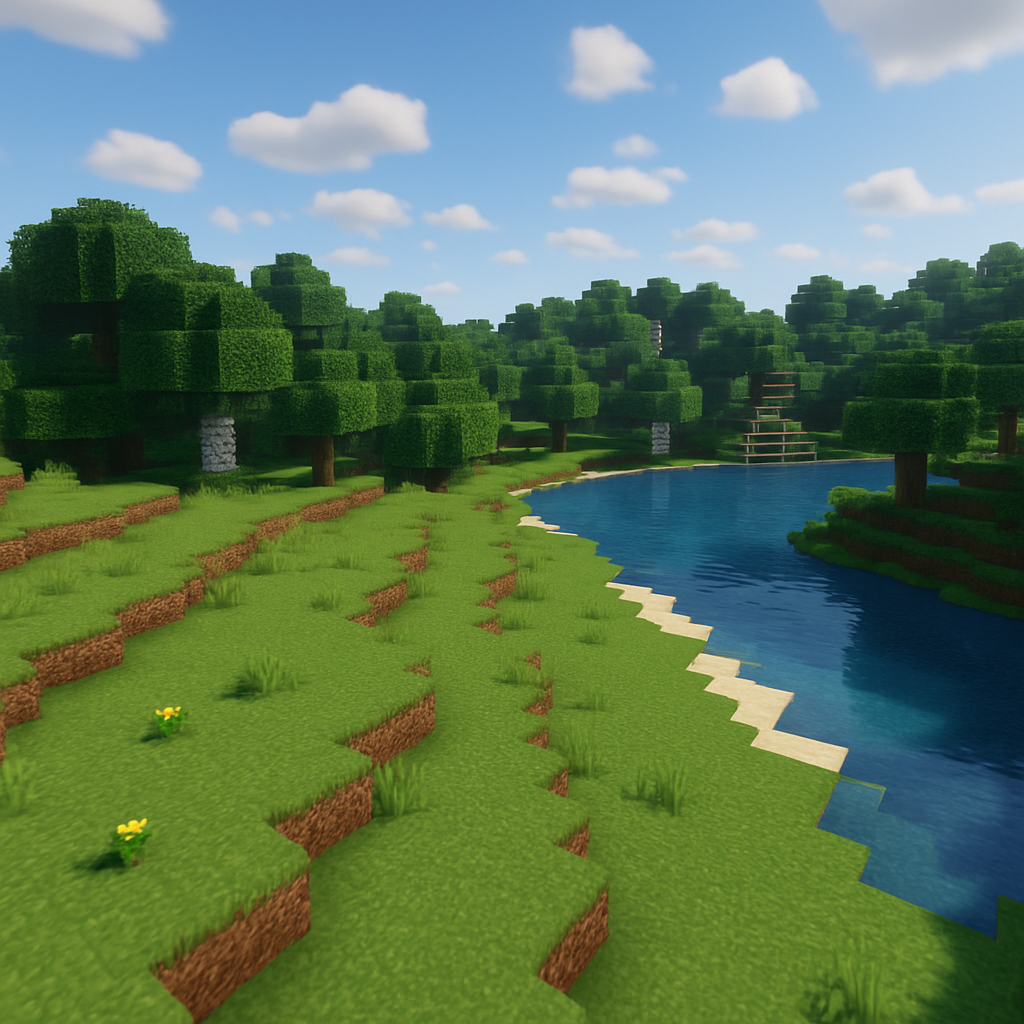
Crafting Realistic Beaches and Coastlines
Beaches and coastlines are all about that transition from water to land. Get this right and your coastal builds will look incredible.
Coastal Formation Principles
Real beaches aren’t flat. They have a profile that goes from deep water, to shallow water, to wet sand, to dry sand, to vegetation. Each zone looks different and serves a purpose.
The underwater approach matters. Don’t just have a cliff that drops straight down into the ocean. Create a gradual slope from the beach into deeper water. Use sand and gravel for the shallows, transitioning to stone or clay in deeper water.
Rocky coastlines are different from sandy beaches. Rocky coasts have more dramatic elevation changes, cliff faces that drop to the water, and less gradual transitions. Choose the right type for your build’s location.
Beach Construction
Start with the slope from water to land. It should be gradual, not steep. Real beaches flatten out where waves break and deposit sand.
Create zones as you move inland. Right at the waterline, sand should be wet-looking (use a slightly different block or mixture if you want to get fancy, though regular sand works fine). A few blocks up is dry sand. Then maybe some coarse dirt or gravel before you hit vegetation.
Dunes are what make beaches feel real. These are small hills of sand, usually with some grass or other vegetation on top. They form where wind deposits sand beyond the regular reach of waves.
For debris, add some variety. A piece of driftwood here (use stripped logs), some kelp washed up on shore, maybe a few dead coral pieces if you’re near a reef. Don’t overdo it, just a few scattered pieces.
Underwater Transitions
Don’t forget what’s beneath the surface. Your beach should have an interesting underwater landscape too. Create gradual depth changes using terrain shaping. Maybe there are some rocks or small reefs just offshore. Kelp forests in the shallower areas add life.
Sea caves where cliffs meet water are dramatic features. These work especially well on rocky coastlines. Create an opening at water level that extends back into the cliff face.
If your beach is near a river mouth (estuaries), create a mixing zone where fresh water meets salt water. These areas often have unique features like mud flats and marsh grasses.
Beach vegetation follows a pattern. Right at the sand you might have some sparse grass, then hardy beach plants, then as you move away from the water you get fuller vegetation and eventually trees if the climate is right for it.
Bringing It All Together
Here’s the thing about landscape building – these features don’t exist in isolation. The real skill is making them work together naturally.
Transition Zones
Where your mountain meets your forest, there should be a gradual transition. The forest might thin out as the slope gets steeper, with smaller, hardier trees at higher elevations. Rock outcroppings might start appearing more frequently.
When your river flows through your forest, the trees near the water should be species that like moisture. The riverbanks might have more lush vegetation. The forest floor should show signs of seasonal flooding in some areas.
Your beach transitioning to inland areas needs thought too. Sandy beach to dunes to coastal vegetation to full forest. Or beach to cliffs to mountain slopes. These transitions make your landscape feel cohesive.
Building Complete Environments
If you’re building a complete biome rather than individual features, think about the story your landscape tells. Is this a temperate region with moderate climate? Is it tropical? Alpine? Each has characteristic features that work together.
Minecraft biomes give you a starting point, but you’re not limited by them in creative mode. You can blend elements from different biomes to create something unique, as long as it makes sense.
Scale everything to match your architectural builds. If you’ve built a massive castle, it needs landscape that matches that scale. A small cottage needs more intimate, detailed landscape work. Going back to those architectural principles we covered earlier helps maintain consistency.
Wrapping Up the Series
We’ve come a long way through this Master Builder Architecture Series. We started with basic building fundamentals, worked through structural design and interior spaces, and now we’ve covered the natural environments that bring everything together.
Here’s my honest advice: start with one terrain type and really master it. Maybe you love mountain building – great, build mountains until you can do them in your sleep. Then move to rivers. Then forests. Then beaches. Each one teaches you something about working with organic, natural forms instead of structured buildings.
The techniques we’ve covered today aren’t just about making pretty landscapes. They’re about creating environments that make your buildings feel like they belong. They’re about world-building in the truest sense.
Your Next Challenge
Pick a flat area in your world and challenge yourself to create a small complete environment. Maybe a mountain with a river flowing from it, through a forest, to a beach. It doesn’t have to be huge – even a 100×100 block area is enough to practice these techniques.
Start with terrain first, then add a building. You’ll be amazed at how much easier it is to design structures when you’ve already created the perfect landscape for them.
And if you’re feeling ambitious, check out some of the best Minecraft building mods that can help with terrain work. WorldEdit and VoxelSniper are game-changers for large-scale landscape projects.
What terrain type are you most excited to try? Mountains, rivers, forests, or beaches? Let me know in the comments – I’d love to see what you create.
This concludes the Master Builder Architecture Series. Thanks for following along, and happy building!