You have built in the Nether before, so you know how it goes. Forty minutes into a promising fortress, a ghast has set your scaffolding alight, a lava flow has swallowed the foundation you just finished, and your hotbar is full of the wrong blocks. None of that is a skill problem. It is a workflow problem, and workflow is fixable.
This guide is about the habits that stop the dimension eating your build time: how you stage a session, how you lay out your hotbar, how you place and clear blocks, and the order you build in. It assumes you already understand the Nether itself, so there are no introductions here. Where Java Edition and Bedrock Edition behave differently, I say so.
🧰 Stage the Session Before You Leave the Overworld
The biggest time sink in a Nether build is the trip home. Every return through the portal costs you a loading screen, a walk and a re-orientation, so treat prep as part of the build.
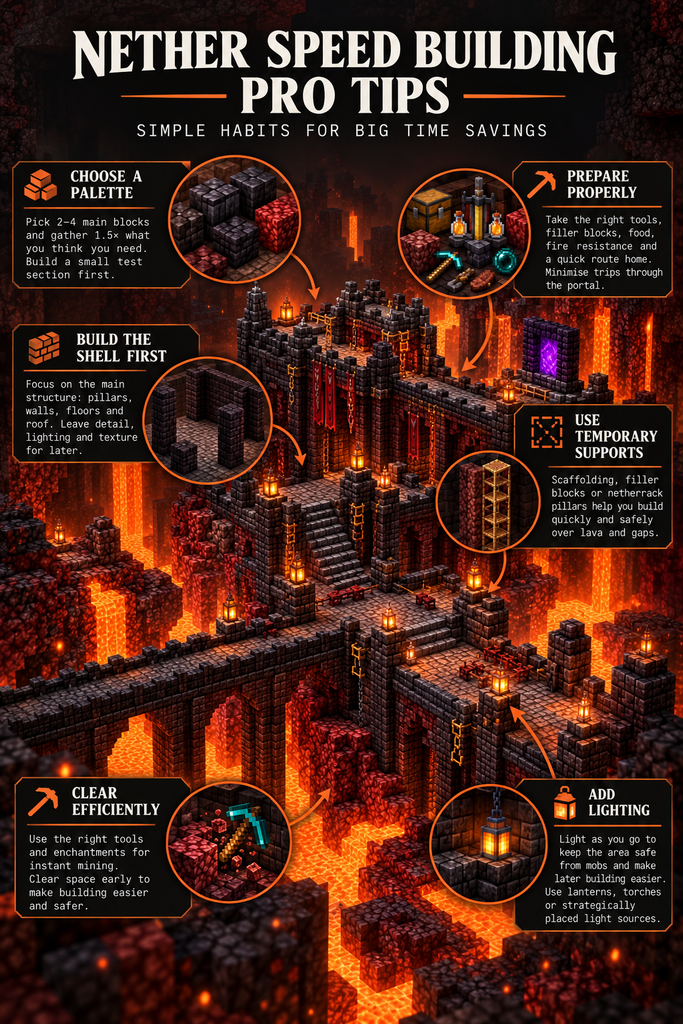
Decide your palette first, then work out quantities. A rough rule is to carry one and a half times what you think the shell needs, because shells always eat more than you estimate. For a full material breakdown, the Nether materials guide covers what each block is good for, so this post will not repeat it.
Your core carry list for a typical session looks like this:
- Your main palette blocks in full stacks (netherrack, blackstone and basalt cover most builds)
- A stack or two of cheap filler for pillars, bridges and temporary walls
- A pickaxe with Efficiency for clearing, plus a spare
- A sword or axe for the occasional hostile mob
- Food, a few ender pearls or a quick route home, and fire resistance (more on that below)
If you are building in Survival, pack the filler from the Overworld rather than breaking it as you go. If you are in Creative, you can skip the carrying but not the planning: a clear palette decision before you start still saves you from mid-build redesigns.
🔥 Fire Resistance: Know What It Actually Covers
Fire resistance is the single best defensive item for Nether work, but it does not cover everything. Per the Minecraft Wiki, it gives complete immunity to fire and lava damage, magma blocks, blaze fireballs and fire charges.
It does not protect you from a direct ghast fireball hit or explosion, though it does stop the damage from fires that explosion creates. It also does not stop blaze melee attacks.
A standard potion lasts three minutes and the extended version lasts eight. That is long enough to finish a task, not a whole build, so brew a handful and drink them at the start of each job rather than waiting for the timer to run out.
There is a Java and Bedrock difference worth knowing. In Java Edition the effect negates damage but you can still catch fire visually, so if the effect expires while you are burning you will start taking damage. In Bedrock Edition the effect prevents you from catching fire at all.
🎒 Hotbar and Inventory Layout for Fast Swaps
Fast building is mostly fast swapping. If you ever scroll through your inventory to find a block, you are losing seconds that add up to hours.
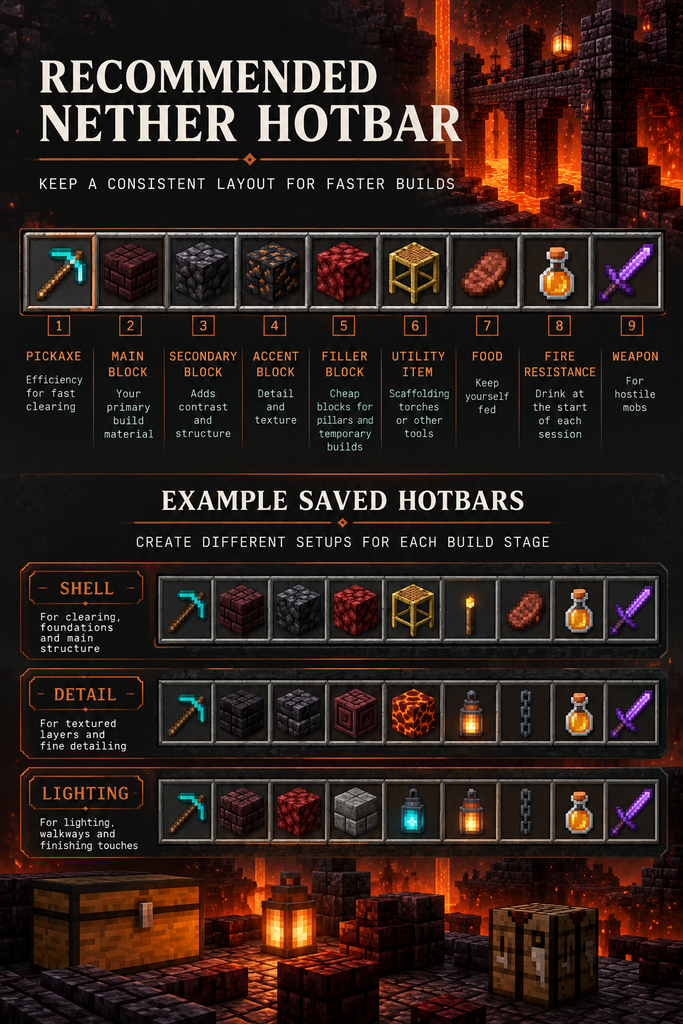
Keep the same slot order every session. Put your pickaxe in slot one, your three or four main palette blocks in the next slots, your filler block next, and your utility item (fire resistance, a sword or a torch) at the end. Muscle memory does the rest.
Keep your core materials stocked in the hotbar and refill from a nearby chest, not from your whole inventory.
Saved hotbars (Java Edition only)
If you build in Creative on Java Edition, saved hotbars are the best workflow upgrade available. Press C plus a number from 1 to 9 to save your current hotbar to that slot, and X plus the same number to load it. You need to have your inventory closed to do either, and you can change the keys in the Creative Mode section of Key Binds.
Save one hotbar per build zone: one for the shell, one for detailing, one for lighting. Saved hotbars are not available in Bedrock Edition, so Bedrock builders should rely on a consistent slot order and the Creative inventory search instead.
Pick block
In Creative, pick block (the middle mouse button or your platform’s equivalent) copies the block you are looking at into your hotbar. On Java Edition, holding Control while you pick also copies a block’s NBT data. It is the fastest way to grab a half-remembered block from your own build without opening the inventory at all.
⛏️ Fast Clearing: Tools, Enchantments and Instant Mining
Clearing terrain is where Survival builders lose the most time, and a few specific tool combinations remove most of the wait. The Minecraft Wiki lists exact thresholds for instant mining, and the Nether ones are useful to memorise.
Netherrack breaks instantly with an unenchanted golden pickaxe, or with a diamond pickaxe at Efficiency II. Basalt breaks instantly with a diamond pickaxe at Efficiency V plus Haste I, or with a golden pickaxe at Efficiency V. Blackstone and its variants take a diamond pickaxe at Efficiency V plus Haste II.
Soul sand breaks instantly with a diamond shovel at Efficiency III. Netherite tools are a little faster than diamond, so those figures are the floor, not the ceiling.
The practical takeaway is to keep two pickaxes. A gold pickaxe with Efficiency is a cheap, fast clearing tool for netherrack-heavy terrain, and a fully enchanted diamond or netherite one handles the harder blocks. If you are working near a beacon, Haste is the cheapest way to close the gap on blackstone.
Remember that fire on netherrack burns indefinitely and cannot be put out by rain. It can also spread to flammable blocks next to it. Clear and cover fire early, before it reaches anything you care about.
🌉 Bridging, Pillaring and Moving Across Gaps
The Nether is full of gaps, so how you cross them matters. The fastest crossing in Survival is the standard sneak-bridge: hold sneak at the edge, place a block and repeat. It works on both editions.
For anything longer than about ten blocks, build a proper walkway instead of a single-width bridge. Place a three-wide strip of cheap filler first, then switch to your palette block as you refine.
When you need height, pillar up with filler and clear the pillar afterwards. Netherrack is the obvious choice here because it is both abundant and quick to mine, as covered above.
If you are building in Creative, flying removes most of this. Double-tap jump to fly, jump to rise and sneak to descend.
🏗️ Build Order: Shell First, Detail Last
The most reliable way to build faster in the Nether is to change the order you do things in. Shell first, detail last, and here is why it suits this dimension in particular.
A shell gives you a defensible, readable volume early. Once the outer walls and roof are up, you have a space where ghasts have fewer clean lines of fire and lava has fewer places to flow. Everything inside is then lower risk.

Work in this order and you will rarely have to undo anything:
- Clear and level the footprint, including capping any lava you will build over.
- Place the structural frame (corners, columns and floor lines) in filler or palette block.
- Fill the walls and roof to complete the outer shell.
- Place doors, windows and major openings.
- Add interior structure, then lighting, then surface detail and palette variation.
Detailing early is the classic trap. A beautiful buttress that you built before the roof will be in the way of your own scaffolding, and a ghast will happily remove it for you. Detail last, and detail in passes: structure, then texture, then lighting.
For a worked example of a large, deliberate Nether shell, the brutalist Nether base guide shows how a strong silhouette is built before the surface detail goes on.
🌋 Handling Lava, Ghasts and Uneven Terrain
These three cause most of the lost time in a Nether session, and each has a quick answer.
Lava
Water is the usual answer in the Overworld, but water placed from a bucket in the Nether disappears instantly. It can exist in a cauldron or be placed with commands, but that is not a practical field fix.
Use solid blocks instead. Cap any source you will build over with filler, and cap the flow before it spreads, because lava travels much further and faster in the Nether than it does in the Overworld. If you want to keep a lava feature as part of the design, the lava features guide covers how to contain and light it safely.
Ghasts
Ghast fireballs set fire to nearby blocks, and blocks with low blast resistance can be destroyed by the explosion. Netherrack in particular has a blast resistance of 0.4, so it does not stand up well to them.
You can deflect a fireball by hitting it with a melee attack or a projectile, which also kills any ghast it strikes. In Survival, build your shell first and put your more fragile detail behind it. For a fuller defence plan, the ghast-proofing guide goes through it in detail.
Uneven terrain
The cheapest fix for uneven terrain is not to flatten it but to build above it. Use columns and a raised floor on filler blocks, then decide whether the terrain below is part of the design or needs filling later. Flattening a whole footprint in Survival is often the slowest option on offer.
Lighting and mob spawns
Piglins spawn in Nether Wastes and Crimson Forest biomes at low light levels, so lighting is both a design choice and a way to cut interruptions. Do your rough lighting early to keep your work area clear, and save the atmospheric lighting for the detail pass. The Nether lighting guide covers the design side.
One more Java and Bedrock difference: piglins that are lightly aggravated in Bedrock Edition can escalate to medium aggravation if you open containers nearby. In Java Edition you can still de-escalate by putting on gold armour. Wear at least one gold piece when you build near them, and keep a chest of your supplies away from any piglin.
🧮 Commands and Tools: When to Reach for Them
You do not need a mod to work faster. Both editions have the /fill and /clone commands, and they are the best way to deal with repetitive structure.
/fill supports replace, destroy, hollow, outline and keep modes in both editions. Hollow and outline are the ones to learn: a hollow fill gives you an instant shell, which suits the shell-first order above. Java Edition also has a strict mode, added in 1.21.5, which places blocks without triggering block updates. Bedrock handles block-state filters with a different syntax, so check the format before you paste a command across.
/clone copies a region to another place, with replace, masked and move modes. Masked copies only non-air blocks, which is exactly what you want when duplicating a wing of a fortress. Bedrock fails if the source region is larger than 655,360 blocks, and Java uses a gamerule for its limit, so for very large copies check your edition’s current limits first.
WorldEdit and Litematica
For larger projects, mods like WorldEdit and Litematica are the next step up, but they are Java Edition tools and need a mod loader, and Litematica is limited to Java. They are worth the setup if you build at scale, and I have compared them in the essential building tools guide, so I will not re-explain them here.
If you are on Bedrock, structure blocks and the commands above are your equivalent, and they go further than most people expect.
🏁 Final Thoughts
Speed in the Nether is not about moving your hands faster. It is about removing decisions, trips and rework: a staged palette, a fixed hotbar, the right tool for each block, and a build order that puts the shell before the detail.
Pick one of these changes for your next session. The hotbar layout and the shell-first order give the biggest return for the least effort, and the rest can follow once those are habit.
For the wider picture on thriving in this dimension, the Nether building mastery guide is the best place to go next.