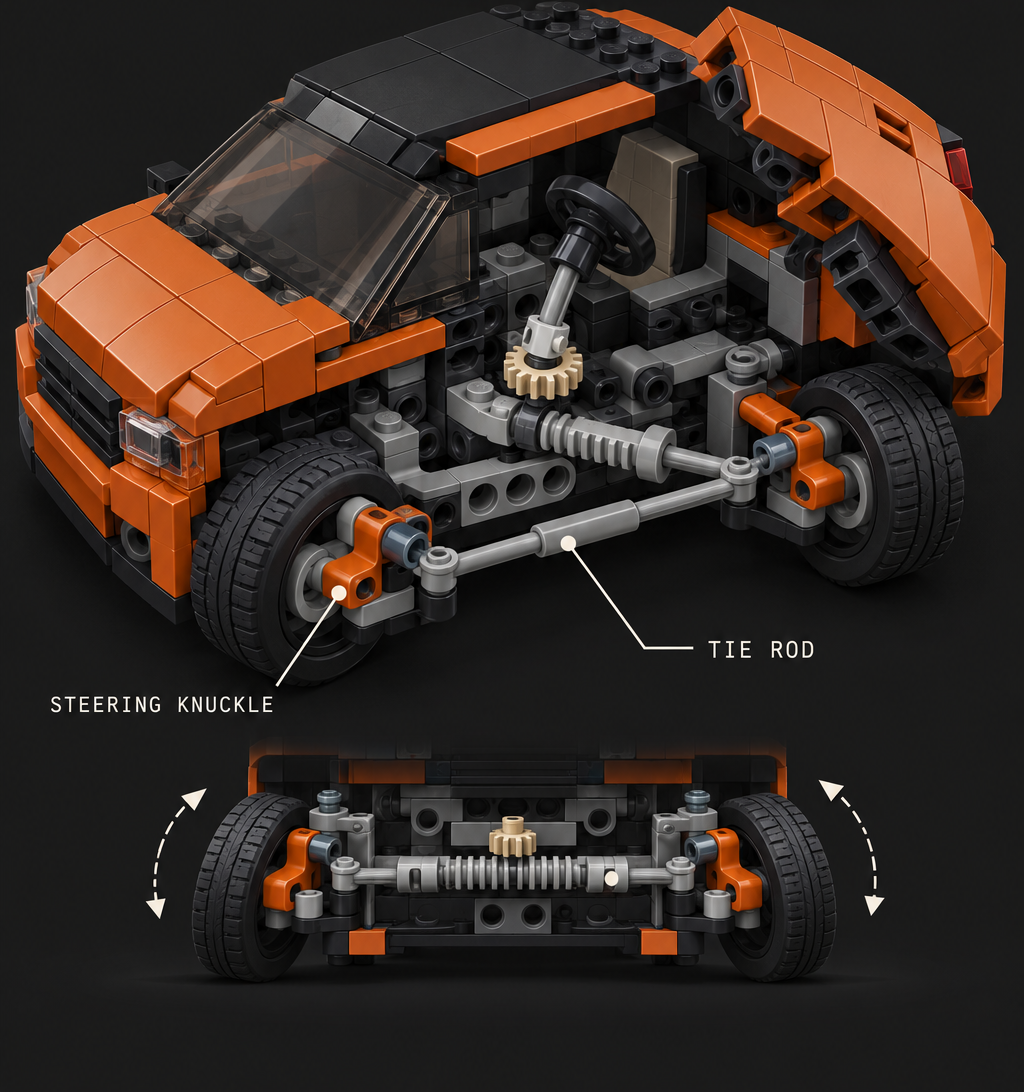
Most Technic steering tutorials assume you’re building a supercar with a wide chassis and room to spare. That’s not much help when your actual vehicle is a minifig-scale City car, six to eight studs wide, with barely enough room inside the bodywork for an engine block, let alone a steering rack. Fitting working steering into a small System-style vehicle is a genuinely different problem, and it’s one most guides skip. This primer covers three mechanisms in rising complexity, so you can pick the one that fits your chassis and your patience.
🚗 Why City-Scale Steering Is a Different Problem
A Technic supercar can hide its steering hardware behind panels with room to breathe. A City-scale car can’t. At six to eight studs wide, every stud of internal space is already fighting for room between the wheel wells, so a steering mechanism has to be compact, low-profile, and forgiving of tight wheel clearance.
Minifig-scale proportions add a second constraint: the wheels themselves are small, which limits how much steering geometry you can physically fit into the hub area. A mechanism built for a large Technic wheel with room for a full steering knuckle assembly often just won’t fit inside a small City wheel arch, so techniques need scaling down, not just copying from a bigger build.
🔧 Mechanism One: Simple Pivot or Turntable Steering
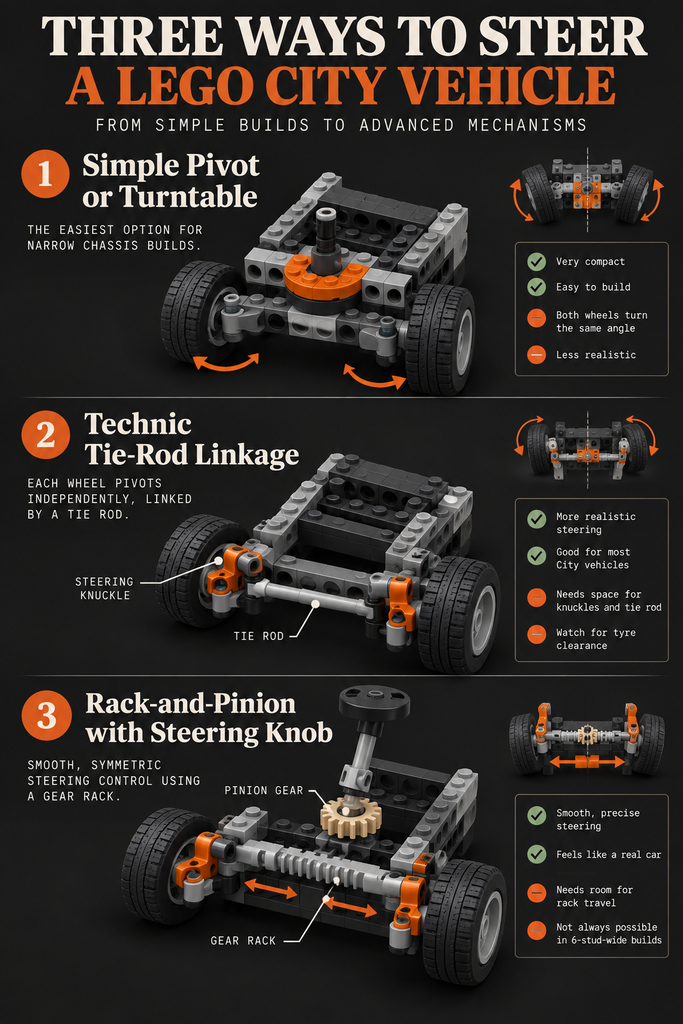
The simplest working steering mechanism uses a small Technic turntable or a single pivot pin under the front axle, letting the entire front axle assembly rotate as one unit rather than steering each wheel independently. It’s the easiest option to fit into a narrow chassis because it needs almost no width, just a turntable and a way to nudge it from above or from a steering wheel linkage.
The tradeoff is realism: both front wheels turn to exactly the same angle around a single pivot point, which doesn’t match how a real car’s wheels behave, but at City scale this is rarely noticeable and the mechanical simplicity is worth it for a first attempt. It’s also the most forgiving option if your chassis is on the narrower end of six studs.
⚙️ Mechanism Two: Technic Tie-Rod Linkage
The tie-rod linkage is the classic Technic steering setup: each front wheel sits on its own steering knuckle (a pivoting hub connected to the axle), and a connecting rod (the tie rod) links both knuckles together so turning one wheel turns the other in sync. A steering arm off to one side, driven by a small gear, a friction pin, or a linkage from a steering wheel, moves the whole assembly.
This is where minifig-scale gets fiddly. You need room for two steering knuckles, a tie rod running between them, and clearance for the knuckles to pivot without the tyres rubbing against the wheel arch or each other. Building the knuckles as narrow and low-profile as possible, using the smallest available pin and axle connectors, and testing the full turning range before you close up the bodywork will save you from finding out too late that the wheels jam at full lock.
🎛️ Mechanism Three: Gear Rack-and-Pinion with a Steering Knob
The most refined option, and the most demanding on space, uses a small gear rack that slides left and right, driven by a pinion gear connected to a steering knob or dial on top of the model. As the rack slides, it pushes and pulls the steering arms on each wheel, giving smooth, symmetric steering input that feels closest to a real car’s system.
This mechanism genuinely doesn’t fit into every City-scale chassis. If your build is on the narrower end of the six-to-eight-stud range, you may need to accept mechanism two instead, or widen the chassis slightly to make room for the rack’s travel distance. Where it does fit, it’s worth the extra build time: a visible or semi-visible steering knob on the model’s roof or bonnet is a satisfying detail in its own right, letting anyone who picks up the model actually steer it by hand.
📐 Turning Geometry: How Much Should You Care?
In a real car, the inner wheel turns at a sharper angle than the outer wheel when cornering (a geometry principle that keeps both tyres rolling smoothly through a turn rather than scrubbing sideways). At LEGO City scale, replicating this precisely is usually more trouble than it’s worth.
For most builders, a simple tie-rod or turntable mechanism where both wheels turn to roughly the same angle is close enough that nobody will notice at normal viewing distance. Save the effort of a full differential steering geometry for a larger-scale project where the extra precision is actually visible, not a six-stud-wide City car.
🚚 Trucks: Longer Wheelbases and Articulated Steering
Trucks bring their own wrinkle: a longer wheelbase gives you more room to fit steering hardware into the chassis, which is the good news, but you’re usually steering only the front axle while a longer, heavier rear section follows along, so the steering arm needs enough leverage to turn the front wheels under that added weight.
For articulated vehicles, forestry loaders, container haulers, or anything with a hinge partway down the body, articulated steering is a different mechanism entirely: instead of turning the wheels, the whole vehicle bends at a central pivot point between the front and rear sections. A simple Technic pin or ball-joint hinge at the midpoint, combined with a way to control the bend angle (a gear, a lever, or just manual positioning for static display), recreates this convincingly without needing wheel-based steering at all.
🏙️ Concealing Technic Inside System Bodywork
Once the mechanism works, the next challenge is making it disappear. City vehicles are meant to look like System builds, not exposed Technic rigs, so the steering hardware needs to hide behind panels, hoods and wheel arches without adding visible bulk.
Build your bodywork panels as a separate outer shell wherever possible, attached with clips or Technic pins rather than studs, so you can remove it to access or repair the mechanism later. Widen the wheel arches very slightly beyond what looks strictly necessary; a small gap here is far less noticeable than a wheel that binds against the bodywork mid-turn. If you want the underlying City vehicle proportions to look right before you start layering Technic underneath, our Technic vs. System guide covers how the two building systems combine, which is worth reading first if you haven’t mixed them before.
🛠️ Troubleshooting: Binding, Slop, and Wheel Rub
Three problems show up again and again in small-scale steering builds, and all three are fixable without starting over.
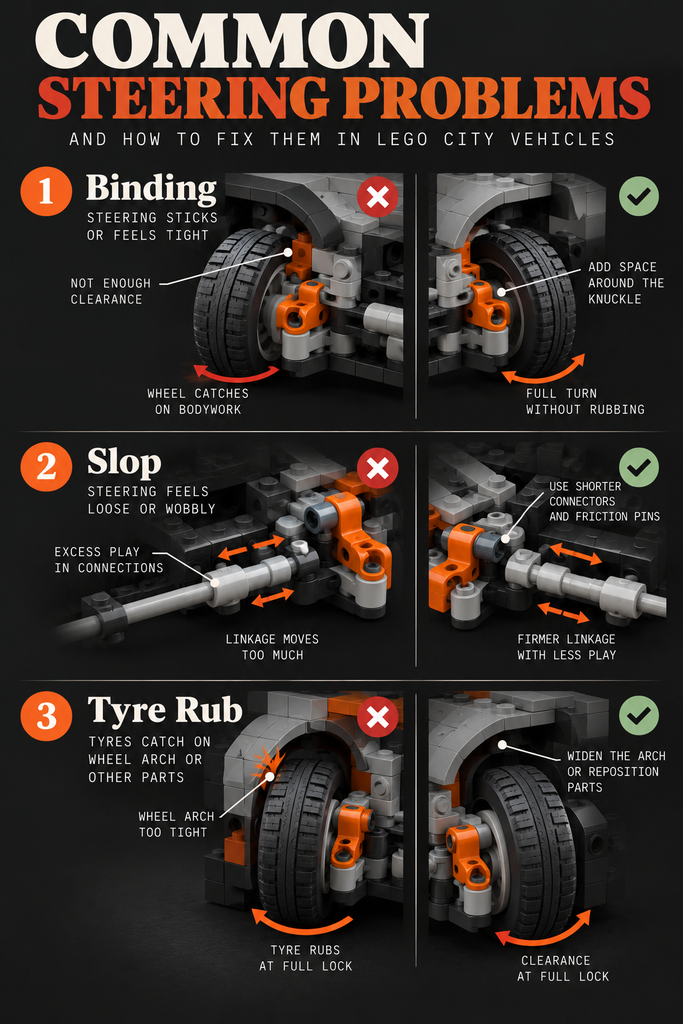
Binding, where the steering sticks or refuses to turn smoothly, is almost always caused by a connector that’s one size too tight or a knuckle pivot with no clearance gap. Swap the offending pin or axle connector for the next size up, or add a single plate’s worth of spacing, and it usually frees up immediately.
Slop, the opposite problem, where the steering feels loose and wanders on its own, comes from connectors that are too loose or a linkage with too many points that can flex. Tightening the connection points and shortening the linkage path where possible reduces play without needing to rebuild the whole mechanism.
Wheel rub against the bodywork at full steering lock is the most common finish-stage problem, and it’s a bodywork issue, not a mechanism issue: widen the wheel arch opening by a plate or two, or shave back the offending panel edge, rather than fighting the steering geometry.
If you’re still short on the specific pins, axles and steering-specific Technic pieces this guide references, our Essential LEGO Piece Inventory for City Builders is a good starting point for building up a stock of the connectors these mechanisms lean on most.
🔑 Choosing the Right Mechanism for Your Build
Start with the simple pivot or turntable if this is your first working-steering build, it’s the most forgiving of a tight chassis and still gives you a satisfying, functional result. Move up to the tie-rod linkage once you’re comfortable with knuckle geometry, and only reach for the full gear rack-and-pinion if your chassis has the width to spare and you want that hands-on steering knob detail.
Whichever mechanism you land on, build and test it on an open chassis before you commit to final bodywork. It’s far easier to widen a wheel arch or swap a stiff connector while everything is still exposed than to discover a binding wheel after the panels are clipped shut. Once the steering turns smoothly through its full range, the bodywork step is just tidying up around a mechanism you already know works.