Most Nether bases are about holding ground: a bastion-style fortress on a ledge, a tidy hub in a cave wall. A floating island base asks a different question. What if the whole build looked as though it had slipped its moorings and drifted out over the lava sea?
Here is the good news for anyone who likes a showpiece. The Nether has no void, so nothing about this build is a feat of engineering, and every bit of it is staging. This guide treats the lava ocean and the open cavern as a theatre set and shows you how to build the illusion of defying gravity.
🌋 Why Floating Works So Well in the Nether
The Nether is only 128 blocks tall, and it has a solid bedrock floor and a bedrock roof, so you are never really suspended over nothing. That is exactly why a floating build is a design decision rather than a survival risk. You are not fighting gravity, because blocks do not fall (apart from the usual suspects like sand and gravel), and the only thing you need to convince is the viewer’s eye.
It also helps to be honest about what the game does not give you. The Nether does not generate natural floating islands.
The nearest things you will find are glowstone clusters hanging from the ceiling and basalt pillars rising out of lava seas in Soul Sand Valley. Everything else on this build is yours, which is the whole appeal.
A floating island lives or dies on silhouette. Think of it as a sculpture you will mostly see from a distance, from a bridge or from across a cavern, with the underside doing as much work as the top. Plan for that from the first block.
If you want a contrast in mood before you commit, the industrial grid of a brutalist Nether base sits at the opposite end of the style spectrum. Floating builds want curves, taper and irregularity instead.
📍 Choosing Where to Float
Where you hover decides your backdrop, your risks and how hard it is to get home. There are three realistic options, and each has a clear trade-off.
Over the lava ocean. Lava seas generate at and below Y 31, so an island hovering around Y 55 to 75 gets a glowing orange floor beneath it. This is the most dramatic backdrop, and the underside catches the light beautifully. The cost is that the whole structure is exposed on all sides, and any access route has to cross open lava.
Above Soul Sand Valley. This biome mixes soul sand, basalt and soul soil with large lava areas, blue fog and basalt spires. It is the moodiest option, with cool blue haze against warm lava, and the spires give you natural anchor points for tethers. It is also a biome with plenty of ghasts and skeletons, so expect company.
Mid-cavern. Parking the island in the open volume between floor and roof gives you the most control. You can tether to real ceiling and wall geometry, and your sightlines are more limited. You lose some drama, but you gain easier access and a calmer build site.
My own preference for a first attempt is the lava ocean in a quiet stretch, because the payoff is so immediate. If you would rather lean into a specific biome, the basalt deltas biome guide covers a very different, ash-grey stage that suits a darker island.
🪨 Shaping the Island Mass
The underside is the hero view. Anyone approaching along a bridge or looking up from the lava level sees the bottom first, so build it as carefully as the top.
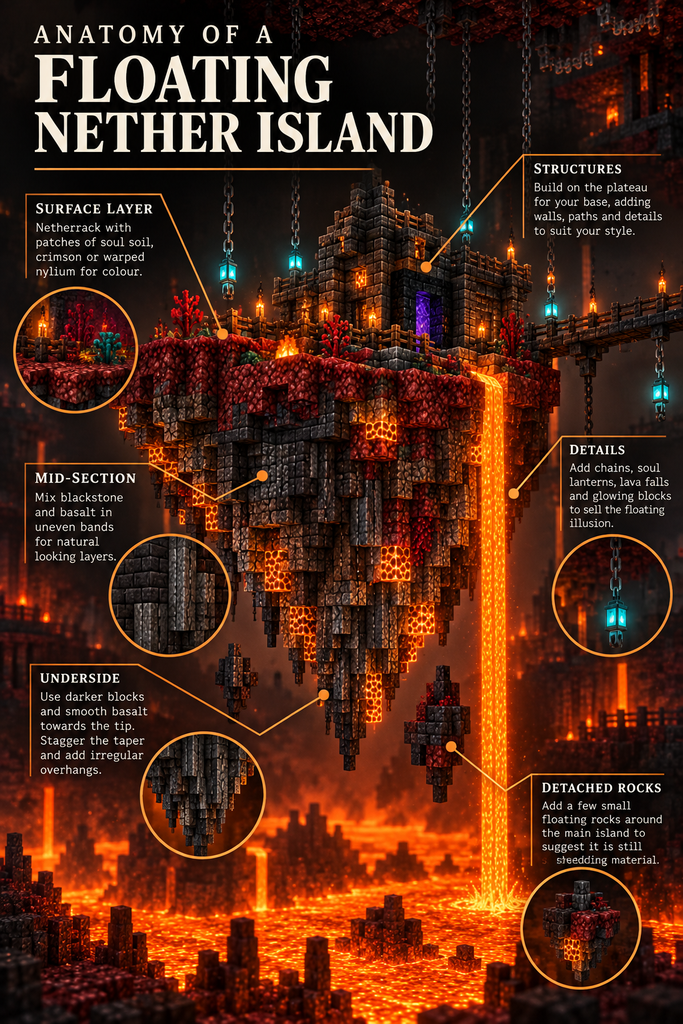
The classic shape is an inverted cone: a broad, uneven plateau on top tapering to a ragged point or cluster of points below. Avoid a perfect geometric cone, which reads as a spinning top. Instead, stagger the taper, add a secondary spur off to one side, and let one edge hang lower than the others.
Irregular edges matter just as much. Pull the perimeter in and out in uneven bites, so there are no long straight runs of more than four or five blocks. Break the outline with small overhangs and a few detached rocks that sit just off the main mass, which suggests the island is still shedding material.
For material, layering is what sells the geology. A workable stack, working top to bottom:
- Surface: netherrack, with patches of soul soil or crimson or warped nylium if you want colour.
- Mid-section: blackstone mixed with basalt, in uneven bands.
- Underside: darker, rougher blocks with smooth basalt and blackstone variants concentrated near the tip.
Basalt is a handy choice because it can be rotated like a log, with its axis set along x, y or z depending on the face you place it against. That lets you create vertical striations down the sides, like columnar rock. You can also smelt basalt in a furnace to get smooth basalt for cleaner, paler bands.
Blackstone is not flammable and does not catch fire from lava, which makes it a sensible choice close to the lava level. For a full breakdown of what each block does and looks like, the Nether materials guide is the place to go, so I will not repeat it here.
A practical tip: block out the silhouette in a single cheap block first, then replace it layer by layer. It is far easier to adjust a taper in netherrack than in a mixed palette.
⛓️ Selling the Gravity-Defying Look
Once the mass looks right, the illusion comes from what you hang around it. Three tools do most of the work: chains, lights and lava.
Chains and tethers. Chains can be placed free-standing in midair, with no supporting block, and they come in three orientations (x, y and z). That makes them a gift for this build, because you can run a chain from the island to the ceiling, or between two points, without needing it to be anchored to anything physical. Run a few at slight angles, in different lengths, and the island reads as held in place by cables rather than simply resting on air.
A small naming note: in Java Edition the original chain was renamed Iron Chain when copper chains arrived in 1.21.9, and Bedrock followed in 1.21.111, so older worlds may only have the single iron chain. Check which block name and chain types your version offers before you plan a palette.
Hanging lanterns. A lantern can hang from the underside of a chain, and the two connect seamlessly. A regular lantern gives off light level 15, while a soul lantern gives off 10. Use the colder soul lanterns on the underside for a blue-green glow against the orange of the lava, and keep regular ones for the working top surface.
Lava-falls. This is the showstopper. A lava source placed on the island’s edge will flow off and fall, and in the Nether lava spreads about 7 blocks horizontally, moving one block every 10 ticks. That is quick enough to look lively but slow enough to read as a molten drip rather than a flood.
Java and Bedrock handle falling lava slightly differently. Java marks flowing lava with lava above it as falling, while Bedrock uses a falling bit and spreads falling lava only downward. In practice, test your fall in a throwaway spot before you commit, and watch where it lands.
Lava is only removed with a bucket on its source, so plan the outlet before you place it. For containment, edge design and the safe way to handle sources, the lava features guide goes through it properly.
🔆 Lighting Without Spoiling the Mood
A floating island is a light show, so lighting it badly wrecks the effect. You want warm light underneath, where it picks out the taper, and restrained light on top so the silhouette stays dark and sharp against the lava glow.
Place lanterns at different heights along your chains instead of in neat rows. Cluster a few near the tip of the underside and leave other stretches in shadow, which gives the island a sense of depth. Glowstone, shroomlight and froglights all work as accents if you want variety, though you should check each block’s actual light output before relying on it.
Lighting also has a practical side, because mobs spawn in darkness. Rather than rehash light levels here, the Nether lighting guide explains how to balance atmosphere against spawn control.
🚪 Getting On and Off the Island
A floating showpiece is no good if you cannot reach it. Access needs to be planned early, because it affects the island’s footprint.
Portal placement. Nether coordinates are scaled 1:8 against the Overworld on X and Z, while Y stays the same. A linked portal search in Java covers a 32 by 32 area in the Nether (a 16 block radius), so a nearby portal on your island may link where you expect, or may not if another portal sits closer. Bedrock uses different search areas, so test the link in both directions before you decorate around it.
The minimum portal frame is 4 by 5, so reserve at least that much room on your top surface, plus space to stand and walk away from it. If you want the portal to be part of the silhouette, an arch of obsidian at the island’s edge looks fantastic against the lava glow.
Bridges and tethers. The cleanest approach is a single slender bridge that connects the island to a hub on solid ground. Treat the bridge as part of the design: a thin spine, perhaps suspended from chains, reads as a lifeline and reinforces the sense that the island is drifting just out of reach.
If you want the island to feel properly isolated, use a bridge that stops short and finish the journey with a boat, an ice path or a deliberate gap that you cross some other way. For hub layouts and travel networks, see the Nether hub design guide.
👻 Living With Ghast Exposure
A floating build has 360 degrees of sightlines, and that is the price of the view. Ghasts can approach from any direction, including below, and fireballs can reach any exposed surface. You do not need to turn the island into a bunker, but you should decide on your approach before you build.
Some builders accept a degree of damage and design the island so blocks can be quickly replaced. Others add covered walkways and shielded interior spaces on the top deck while keeping the underside open and exposed for display. Both are valid, and both are easier if you plan the footprint with defence in mind.
For specific techniques, the ghast-proofing guide covers it in depth, so I will leave the detail there.
🧱 Build Stages From Footprint to Finished Silhouette
Here is a build order that keeps the work manageable and the result cohesive.
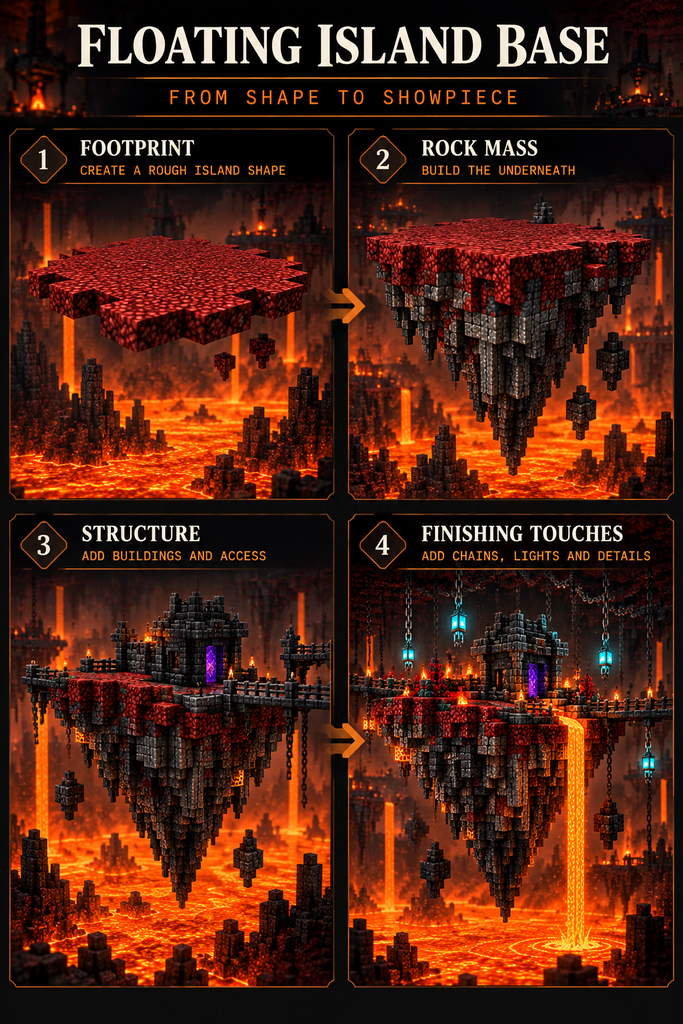
- Pick the site and set a reference height. Decide your biome, mark the lava level and choose the altitude of the island’s top surface. Remember the Nether is 128 blocks tall with a bedrock roof, so leave room above for chains and tethers.
- Mark the footprint. Lay out the top surface in a cheap block, with an irregular outline and a clear spot reserved for the portal.
- Build the taper. Work downward from the footprint in stepped rings, shrinking each one and shifting the centre slightly so the cone leans.
- Break up the shape. Add overhangs, a secondary spur, detached rocks and uneven edges. Step back often and check the silhouette from a distance.
- Layer the materials. Replace your placeholder block with the netherrack, blackstone and basalt stack, concentrating the darkest blocks near the tip.
- Add the structure on top. Keep the buildings low and angular so they sit comfortably on the plateau. Leave the skyline simple.
- Hang the tethers. Place chains from the island to the ceiling or between anchor points, then add lanterns at varied heights.
- Install lava-falls. Place sources on the edge, test the flow and refine the outlets.
- Connect the bridge and test access. Check the portal link in both directions and walk the whole route.
- Do a final silhouette pass. View the island from every approach, at distance, with your lights on, and adjust anything that looks symmetrical or heavy.
Speed matters on a build this size, particularly the tapering and layering stages. If you want to cut the repetitive work down, the techniques in the Nether speed building guide are worth a look.
✨ Final Thoughts
A floating island base succeeds when it reads clearly from a distance and rewards a closer look. Get the taper right, hang the details with intent, and let the lava do the lighting.
Because the Nether has no void, you are free to treat gravity as a visual theme rather than a rule. Build the illusion carefully and the sea of lava below will do the rest of the work for you.