There’s a moment every adult builder experiences—scrolling through images of sprawling Lego cities online, feeling equal parts inspiration and overwhelm. You know you want to create something beyond a single building, but where do you even start? How much space will you actually need? Can you afford it without taking out a second mortgage?
Building a Lego city as an adult isn’t about recreating childhood—it’s about creating something childhood you could only dream of. It’s about combining the immediate satisfaction of official sets with the creative freedom of custom builds, all while developing a display that grows with your skills and interests. Whether you’re drawn to the structured elegance of modular buildings or the unlimited potential of completely original designs, understanding the fundamentals will save you time, money, and frustration.
This guide answers the four critical questions that stop most potential city builders before they begin: why adults love city building, how much space you realistically need, what your city will actually cost, and whether you should buy official sets or build custom.
We started our own journey with the Jazz Club, sourced parts for the Brick Bank, and adapted the Family Reunion Celebration into modular format—proving there’s no single “right” way to begin. Now with 160+ projects in various stages, from small vehicles to a massive custom train station, we’ve learned what works and what doesn’t.
What Makes Lego Cities Special for Adult Builders
City building occupies a unique space in the adult building communities landscape. Unlike single builds that have a defined endpoint, cities offer something fundamentally different—a creative canvas that never demands completion yet always feels rewarding.
Creative Control Meets Structure
The beauty of city building lies in its perfect balance between freedom and framework. Unlike random building where anything goes, cities have real-world logic that guides your decisions without constraining them. When you look at a developing cityscape, you naturally understand where a park should go, why certain buildings need to be taller, or how streets should flow. This intuitive structure helps adult builders make design decisions with confidence.
The combination of official sets and MOCs (My Own Creations) creates a satisfying workflow. Official sets provide instant gratification—open the box, follow the instructions, and you have a complete, professionally designed building within hours. Custom builds offer the opposite pleasure: unlimited creative expression within your theme, scale, and budget. Most successful cities blend both approaches, letting you switch between construction modes based on your energy level and available time.
What’s particularly satisfying is watching disparate pieces come together into a cohesive whole. That Friends set you adapted? It suddenly makes perfect sense next to your modular buildings. Those vehicles you built months ago? They bring your streets to life. The accumulation of small decisions—color schemes, architectural styles, street layouts—gradually creates something that feels unmistakably yours.
Continuous Evolution
Cities are never “finished,” which is either terrifying or liberating depending on your perspective. For adult builders, this ongoing nature is actually one of the format’s greatest strengths. There’s no pressure for perfection because real cities themselves have variety, imperfection, and constant change. That building you’re not entirely happy with? In a year, you might rebuild it completely, or you might decide its quirks give your city character.
This continuous evolution aligns perfectly with how adults actually engage with hobbies. We have busy lives—jobs, families, other interests. City building accommodates this reality beautifully. You can add one building every few months and still make meaningful progress. You can spend a Saturday afternoon detailing a single street corner. You can maintain your city as a background project while other hobbies take center stage, then dive back in when inspiration strikes.
Our own journey illustrates this perfectly. We started with three buildings—the Jazz Club (retail set), Brick Bank (parts-built), and a modified Family Reunion Celebration. That felt like a complete city at the time. Months later, those three buildings became one corner of something larger. Now, with 160+ projects in various stages, the city has grown organically as our interests evolved. Some projects take weeks to complete; others sit partially built for months. Both approaches are valid.
The ability to expand gradually as budget and space allow removes the pressure of massive upfront investment. Your city might start on a 4×4 foot display, move to a 6×8 table, and eventually claim an entire room. Or it might stay compact but become incredibly detailed. There’s no wrong way to grow.
Display Value and Community Connection
Cities command attention in ways single builds don’t. When guests see a well-developed city, they naturally move closer, point at details, and start conversations. There’s something about urban environments—even miniature ones—that invites exploration. People identify their favorite buildings, suggest additions, and share their own city-living experiences.
This display value extends to photography and social media. A single modular building makes a nice photo. A street scene with multiple buildings, vehicles, and minifigures tells a story. The visual depth of cities creates compelling content that fellow builders appreciate and engage with. Many adult builders find that documenting their cities becomes its own rewarding hobby.
The community connection runs deeper than just showing off your work. City builders share a common language about layout challenges, scale decisions, and parts sourcing strategies. Online communities like Reddit’s r/legoRaiseCity and various AFOL forums become valuable resources for inspiration and troubleshooting. Local LUG (Lego User Group) events often feature collaborative city builds where individual builders bring their creations to form temporary mega-cities.
This collaborative aspect matters because city building can sometimes feel isolating—you’re working on something too large and personal to easily share in person. Connecting with other city builders reminds you that your challenges (Where do I put that weird building? How do I afford more modulars?) are universal, and solutions are often just a forum post away.
Real-World Skill Development
Beyond the obvious benefit of advanced building techniques, city building develops surprisingly practical skills. Urban planning principles become intuitive as you balance commercial, residential, and recreational zones. You learn why cities arrange themselves certain ways, why certain street layouts work better than others, and how buildings relate to their environment.
Spatial reasoning improves dramatically. You develop an almost instinctive sense of scale consistency, proportion, and how three-dimensional spaces interact. These skills transfer to everything from furniture arrangement to understanding architectural drawings. Many city builders report seeing their actual cities differently—noticing building details, street layouts, and urban design choices they previously overlooked.
Project management across months or years becomes necessary. With 160+ projects in various stages, we’ve learned to prioritize based on display impact, parts availability, and excitement level. This mirrors professional project management: you can’t do everything simultaneously, so you make strategic decisions about resource allocation. The difference is that when you’re managing your Lego projects, the deadlines are self-imposed and the consequences of delay are nonexistent—making it perfect practice without pressure.
Parts sourcing and inventory management become essential skills. Understanding BrickLink, combining orders for shipping efficiency, tracking wanted lists, and organizing your collection are all valuable capabilities. These translate to general research skills, budget management, and organizational systems that benefit other areas of life.
How Much Space Do You Actually Need?
The space question stops more potential city builders than any other concern. Many assume they need an entire spare room, leading them to abandon the idea before starting. The reality is more flexible and forgiving than you might expect.
Minimum Viable City
Let’s start with the honest truth: 4×4 feet (two baseplates) is the practical minimum for a genuine “city feel.” A single modular building, no matter how impressive, doesn’t create urban atmosphere—it’s just a building. Cities need context: neighboring structures, streets, space between buildings, and room for the details that bring everything to life.
With 4×4 feet, you can comfortably accommodate 3-4 modular-sized buildings plus basic roads. This is enough to establish your city’s character, test your layout preferences, and determine if you want to expand. Think of this as your proof-of-concept phase—you’re learning what works without committing to massive space requirements.
This minimum footprint fits on a standard table or sturdy desk. Many builders start with an IKEA LINNMON tabletop (approximately 4×2.5 feet) and expand with a second one when ready. The key is having a dedicated surface—trying to build a city on your dining table means constant setup and teardown, which kills momentum faster than anything else.
Standard City Sizes
As your city grows, these sizes represent natural progression points:
Starter City: 4×6 feet accommodates 6-8 modular buildings with room for proper street layouts and small details. This is where most builders comfortably settle for their first year or two. You have enough space to establish distinct areas—perhaps a commercial district and residential zone—without overwhelming yourself with empty space to fill.
Established City: 6×8 feet supports 12-15 buildings plus meaningful infrastructure. At this size, you can create convincing neighborhoods, add parks and public spaces, and develop architectural themes across different districts. This is where cities start feeling genuinely urban rather than like a collection of buildings. The space allows for proper depth—background buildings that don’t demand foreground detail but fill out your skyline.
Large Display: 8×10+ feet hosts 20+ buildings and multiple distinct districts. You can implement realistic city planning, create visual journeys as viewers explore your display, and include significant green spaces without feeling sparse. This is “forever city” territory for most builders—at this scale, you’ll constantly evolve your city rather than needing more space.
Our current setup sits in the established category, though our 160 projects in progress would fill a large display several times over. The reality of city building is that you’ll always have more ideas than space, which is actually beneficial—it forces creative decisions rather than just building everything that seems interesting.
Vertical vs. Horizontal Planning
Space-constrained builders often overlook vertical solutions. Shelving allows you to create a multi-level city where different elevations represent different districts or eras. An elevated section might be your modern downtown, while the lower level represents an older historical quarter. This isn’t just space-saving—it adds visual interest and architectural storytelling.
Eye-level display matters more than most builders initially realize. A city at waist height or below loses impact because viewers can’t appreciate the street-level details. Raising your city to chest or eye level dramatically improves the viewing experience and makes photography easier. Many builders use Kallax units or custom tables with storage underneath, maximizing useful space.
Multi-level cities can incorporate basements visible from the side—the subway system, underground parking, or service tunnels that hint at infrastructure. This works particularly well if your display is against a wall but accessible from the side, letting you create depth that rewards close examination.
Common Space Mistakes
The biggest space mistake is underestimating how quickly cities grow. You start with careful spacing, leaving generous roads and open areas. Six months later, you’re squeezing buildings together and regretting those wide boulevards. Plan tighter than feels comfortable initially—you can always add parks later, but you can’t easily reclaim space once filled.
Not planning for access to back sections frustrates many builders. If you can’t reach the rear buildings without disrupting the front ones, you’ll never adjust, clean, or photograph the back. Allow at least 12 inches of clear space on all sides, or design your city in removable sections you can lift out for access.
Forgetting lighting needs means dealing with awkward shadows and poor photography. Plan your lighting solution early—whether that’s overhead lighting, strategically placed LED strips, or purpose-built photography lighting. Your display space needs electrical access for any lighting setup.
Dust management often goes unconsidered until it’s too late. Lego attracts dust like a magnet, and a sprawling city offers countless surfaces for accumulation. Some builders use display cases (expensive but effective), others accept regular dusting as part of maintenance, and some design cities with easily removable sections for cleaning. Factor this into your space planning.
Realistic Timeline Expectations
Time requirements complement space considerations. Your first modular build takes 4-8 hours—longer if you’re learning techniques from the instructions, shorter once you develop rhythm. Custom builds vary wildly: a simple shop might take 10 hours, a detailed department store could consume 40+ hours.
A basic 4×4 starter city represents roughly 40-60 hours of total building time. Spread across weekends and evenings, this might take 2-3 months. Or you might binge-build over holiday break. The key is accepting that building happens in sessions—this is fundamentally a marathon hobby.
Our 160 projects in various stages didn’t happen overnight. Some have been “in progress” for over a year, waiting for specific parts or renewed inspiration. Others come together in intense weekend build sessions. Both patterns are normal and healthy. The pleasure of city building isn’t just the finished product—it’s the ongoing process of creation, revision, and improvement.
Environmental Considerations
Long-term displays need environmental planning. Direct sunlight fades certain colors (especially reds and yellows), so position your city away from windows or use UV-filtering film. Temperature and humidity extremes can affect clutch power over time—avoid garages or attics with wild temperature swings.
Pet and child access requires honest assessment. Cats knock things over. Dogs’ wagging tails clear shelves. Young children explore with hands. There’s no judgment here—just practical reality. Some builders accept occasional reconstruction as part of city life. Others install barriers, display in closed rooms, or wait until kids are older. Choose what works for your household rather than fighting inevitable physics.
What Will Your City Actually Cost?
Let’s address the expensive elephant in the room. Lego isn’t cheap, and cities require significantly more pieces than single builds. However, strategic planning makes city building surprisingly affordable—especially when you embrace the long-term nature of the project.
All prices below are shown in both USD and GBP (£) to help international builders plan effectively. Exchange rates fluctuate, but these figures represent reasonable expectations for UK builders in 2025.
Starter City Budget Tiers
Understanding realistic budgets helps prevent both under-investment (buying random pieces without coherence) and over-investment (spending money you’ll regret). These tiers represent complete starter cities, not single buildings.
Budget Tier 1: $300-500 / £240-400 (Minimum Viable City)
This entry-level budget gets you started without major financial commitment. You’re looking at 2-3 modular buildings from previous years purchased through BrickLink, basic road plates, and minimal custom detailing. The timeline is 3-6 months to assemble, primarily limited by budget rather than construction time.
At this tier, prioritize visual impact over variety. Two impressive buildings with a good street scene beats three mediocre structures spread apart. Focus on core buildings that establish your city’s character—perhaps a commercial building and residential structure with quality roads connecting them.
Budget Tier 2: $800-1,200 / £640-960 (Solid Foundation)
This middle tier represents where most dedicated city builders naturally settle. You can afford 4-5 modular buildings (mixing newer retail sets with parts-built retired designs), a complete road system with proper intersections, vehicles and minifigures for street life, and budget for custom smaller builds like food carts, bus stops, and small parks.
Timeline extends to 6-12 months, which actually works in your favor—spreading purchases across a year makes each addition feel like an event rather than a major expenditure. This is also enough time to learn what you love building, what techniques excite you, and where you want your city to evolve.
Our own city started firmly in this tier. The Jazz Club retail set (£160 / $210) gave us one complete building immediately. Building the Brick Bank from parts (roughly £100 / $130 vs. £250-300 / $325-390 for used complete set) saved money while teaching us BrickLink navigation. The Family Reunion Celebration set (£85 / $110) plus about £40 / $50 in additional parts for modular conversion gave us three distinct buildings for under £400 / $520 total.
Budget Tier 3: $2,000-3,000 / £1,600-2,400 (Impressive Display)
This ambitious tier creates a genuinely impressive display from the start: 8-10 modular buildings, multiple districts (commercial, residential, industrial), significant custom work, and advanced details like lighting and landscaping. Timeline is 12-18 months—not because building takes that long, but because thoughtful accumulation creates better results than rushed purchasing.
At this level, you’re not just building a city; you’re building a serious display piece that commands attention. This budget allows for some luxury choices—buying a rare retired modular at premium prices because you love it, investing in custom lighting systems, or commissioning custom-printed elements.
Most builders don’t start here, but if you have the budget and confidence in your commitment, starting strong provides immense satisfaction and motivation to continue.
Cost-Saving Strategies
Strategic spending matters more than total budget. The difference between an impressive $1,000 city and a disappointing $1,500 city often comes down to smart purchasing rather than overall expenditure.
BrickLink Mastery
BrickLink is the secret weapon of cost-conscious city builders. Retired modulars often cost less than their original MSRP because sellers are eager to move inventory. Buying loose pieces for custom builds costs roughly 75% less than buying sets for parts. “Good enough” condition for background buildings—minor scratches or slight discoloration—saves money without impacting your display from normal viewing distance.
Learning to navigate BrickLink effectively takes a few hours of exploration, but the investment pays off immediately. Understanding wanted lists, comparing sellers, combining orders for shipping efficiency, and timing purchases around sales dramatically reduces costs. Many experienced builders spend less per year than beginners assume a single building costs.
Real example: We sourced all parts for our Brick Bank (set 10251) for approximately £100 / $130. A used complete set on BrickLink costs £250-300 / $325-390. A new sealed one? £400+ / $520+. By building from parts, we saved £150-200 / $195-260 while learning invaluable parts-sourcing skills.
Strategic Set Selection
Not every building in your city needs to be modular scale or official modular series. Creator 3-in-1 sets work excellently as background structures—smaller, less detailed, but perfectly acceptable when positioned behind your focal point buildings. City and Friends sets provide amazing value for parts-per-dollar, plus they include useful accessories, vehicles, and minifigures.
Our Friends set strategy exemplifies this approach. We buy Friends sets at retail prices (£40-80 / $50-100), then source additional parts (£20-40 / $25-50) to convert them to modular scale. Total cost: £60-120 / $75-150 per modular-sized building. Compare this to £160-280 / $210-365 for official modulars. The conversion process teaches valuable adaptation skills and creates buildings unique to our city.
The Modular Program Advantage
Official modular buildings seem expensive at £160-280 / $200-365 each, but they offer several economic advantages. One new modular per year is a manageable £160-280 / $200-365 annual expense—less than many hobbies cost monthly. Used modulars retain or increase value, meaning your collection is effectively an investment. Many builders sell earlier modular purchases to fund new ones, creating a budget-neutral collection rotation.
The retired modular market proves this point. Sets like Café Corner (10182) originally retailed for £95 / $149 in 2007 and now sell for £1,500+ / $2,000+ in good condition. Even modern modulars appreciate. The Detective’s Office (10246), £130 / $160 at retail in 2015, now sells for £300+ / $390+ used. While not every set appreciates dramatically, modulars generally maintain value better than most Lego sets.
The Parts-Only Approach
Building official designs from sourced parts rather than buying complete sets offers enormous savings with a few trade-offs. The parts-built approach typically costs 40-50% less than buying used complete sets and 60-70% less than new retail. The trade-off is time investment—sourcing takes hours of research, and assembly requires downloading instructions separately.
For us, building the Brick Bank from parts was transformative. We learned proper BrickLink workflow, discovered which sellers reliably stock rare pieces, understood color substitution possibilities, and gained confidence in parts sourcing. These skills now make every future project more affordable. The time investment was maybe 5-6 hours of sourcing spread across evenings—well worth the £150 / $195 savings.
Hidden Costs to Budget For
New builders often overlook essential expenses beyond the buildings themselves:
- Baseplates: £15-30 / $15-30 each, and you need multiple for city-scale displays
- Display solution: £80-400 / $100-500 for table, shelving, or custom construction
- Storage for spare pieces: £40-80 / $50-100 for proper organization systems
- Lighting (optional): £40-160 / $50-200 for basic LED strip systems
- Dust covers or display case: £80-240 / $100-300 if you choose this route
These hidden costs add £215-710 / $265-880 to your total investment. Factor them in from the start rather than being surprised later.
Monthly Budget Approach
Monthly budgeting transforms city building from overwhelming expense to sustainable hobby. Rather than finding £1,000 all at once, spreading investment across time makes nearly any budget work.
£40 / $50 per month creates a solid city in 12-18 months. This might mean buying one set every quarter, sourcing parts for custom builds regularly, or combining both approaches. It’s manageable even on modest budgets.
£80 / $100 per month builds an impressive city in 12 months. You can afford one modular every 2-3 months plus regular parts orders for custom work. This is the sweet spot for serious hobbyists—significant progress without financial strain.
£160 / $200 per month creates a major city in 6-9 months. You’re buying official sets regularly while simultaneously building custom structures. This budget allows for both quantity and quality, though diminishing returns do apply—spending more doesn’t always create proportionally better results.
Our approach falls in the middle range. Some months we spend £120 on a retail modular. Other months we spend £40 on parts for custom builds. A few months we spend nothing, working on projects we’ve already sourced. The flexibility keeps the hobby fresh while maintaining sustainable spending.
What NOT to Spend Money On Early
Resist the urge to buy everything that seems useful. These purchases can wait until your city is established:
Lighting systems seem essential but add them later once you understand your city’s layout and photography needs. Early lighting investments often get replaced or repositioned as your city evolves.
Every vehicle set released is tempting but unnecessary. Cities need some vehicles for life and scale, but you don’t need comprehensive vehicle collections immediately. A few well-chosen vehicles provide the same impact as dozens of mediocre ones.
Duplicate modulars for “street depth” rarely delivers the hoped-for visual impact. One Jazz Club looks great. Two identical Jazz Clubs on the same street looks odd. If you love a modular design, buy it—but don’t buy duplicates unless your city is large enough to separate them by many blocks.
Expensive custom printed elements or rare minifigures add personality but aren’t necessary for impressive displays. Stock minifigures and standard pieces build beautiful cities. Save specialized purchases for later when you know exactly where they’ll enhance your existing work.
Modular Buildings vs. Custom Builds: The Great Decision
Every new city builder faces this question: should I buy official modular buildings, create my own custom designs, or somehow combine both? The answer fundamentally shapes your budget, timeline, and ultimate city character.
The truth is that this isn’t actually an either/or choice—most successful cities blend both approaches, leveraging the strengths of each while mitigating weaknesses. Our first three buildings demonstrate this perfectly: one retail modular (Jazz Club), one parts-built official design (Brick Bank), and one adapted hybrid (Family Reunion Celebration modular conversion). Each approach taught different skills and served different purposes.
Understanding Modular Buildings
The Modular Building System represents Lego’s premium product line for adult builders. These sets share a consistent 32×32 stud footprint, allowing seamless connection while maintaining architectural variety. They’re designed to connect directly side-by-side, creating continuous city blocks that feel cohesive despite representing different architectural styles and time periods.
What Makes Them Special
Modular buildings pack extraordinary detail density. Interior floors feature full furnishings and character vignettes. Exteriors showcase advanced building techniques like SNOT building, complex color blocking, and architectural detailing that would take most builders hours to devise independently. They’re essentially master classes in technique disguised as playsets.
The premium price point (£160-280 / $200-365) reflects this complexity. You’re not just paying for pieces—you’re paying for professional design work, tested structural integrity, detailed instructions that teach advanced techniques, and packaging that protects intricate sub-assemblies during manufacturing and shipping.
The Modular Advantage
Guaranteed quality design eliminates uncertainty. When you buy the Jazz Club (our first modular), you know the result will look impressive. There’s no risk of structural failures, proportion problems, or aesthetic disappointments. This confidence matters enormously for builders uncertain about their skills.
Immediate gratification satisfies the desire for tangible progress. Open the box Friday evening, build through the weekend, and Monday morning you have a complete, impressive structure. This contrasts sharply with custom building, where a similar building might require weeks of design iteration plus months waiting for parts.
Strong resale value provides financial security. Official modulars maintain or increase value because of scarcity (limited production runs), quality, and collector demand. If you decide city building isn’t for you, or want to rotate your collection, modulars resell easily at or above purchase price.
Community recognition creates instant common ground with other builders. Mention you have the Assembly Square and fellow AFOL collectors immediately know what you’re displaying. This shared reference point facilitates discussion about techniques, modifications, and display strategies.
Detailed instructions serve as masterclasses in technique. Following modular instructions teaches SNOT techniques, structural reinforcement methods, interior detailing strategies, and color blocking approaches you can apply to future custom work. We learned techniques from the Jazz Club that we now use in custom builds regularly.
The Modular Limitation
Expensive per building means progress feels slow. £160-280 / $200-365 buys one modular but could buy parts for three custom buildings of similar size. This cost difference significantly impacts how quickly your city grows.
Limited selection constrains variety. Only 3-4 modulars are in production simultaneously, and the product line releases new sets slowly (typically 1-2 per year). If you only buy retail current modulars, your city will look like everyone else’s.
Everyone has the same buildings creates recognition but eliminates uniqueness. When three cities in your local LUG all feature the same modulars, differentiation comes down to arrangement rather than architecture. The buildings themselves become homogeneous.
May not fit your city’s specific theme presents another challenge. If you’re building a Victorian-era city and Lego releases a modern gym modular, it disrupts your aesthetic. Custom builders can ensure every structure serves their vision; modular collectors must work around what’s available.
Best Modulars for Beginners
Not all modulars are equally beginner-friendly. Some feature complex techniques requiring patience and skill, while others build straightforward and forgiving.
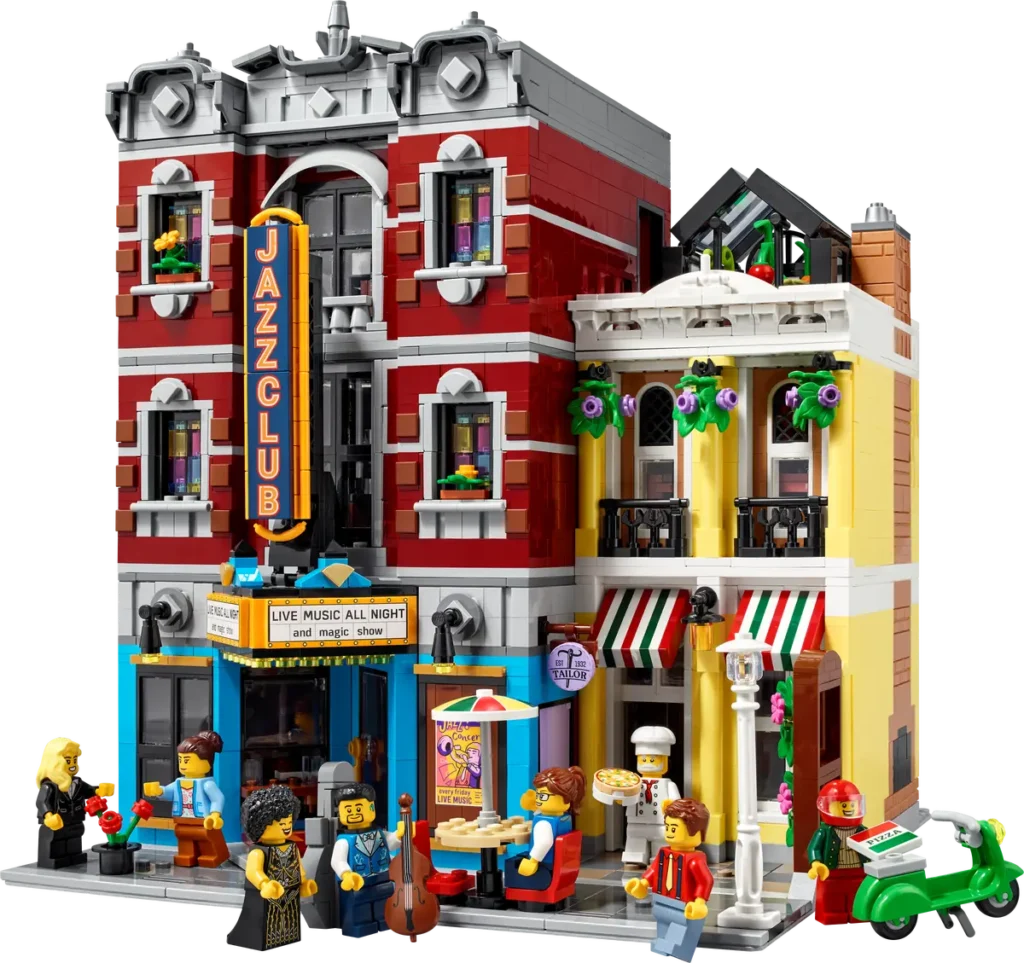
1. Jazz Club (10312) – £160 / $210 – We chose this for our first modular specifically because it offers fantastic street presence, excellent interior details, and teaches intermediate techniques without overwhelming complexity. The art deco styling works in most city themes, and the corner building configuration creates interesting layout possibilities. The build process is immensely satisfying—each floor reveals new details, and the finished structure photographs beautifully from every angle.
2. Bookshop (21330) – £140 / $180 – This set perfectly showcases why modulars are worth their premium pricing. The technique variety is astounding—nearly every advanced method appears somewhere in the build. The instructions are exceptionally well-designed for learning, with clear subassembly breakdowns that make complex techniques approachable. It’s also one of the more affordable entry points into the modular system.
3. Police Station (10278) – £160 / $200 – Outstanding value based on piece count, plus it includes rare printed pieces and valuable minifigures. The build is straightforward but not boring, teaching solid techniques without demanding expert skills. As a public building, it fits virtually any city theme.
Avoid complex or expensive entries for your first modular. The Sanctum Sanctorum (76218), while technically modular-compatible, features Marvel theming and unusual structural requirements that don’t teach typical modular building approaches. Similarly, wait on the extremely large sets like Assembly Square until you’ve mastered standard modular construction.
Understanding Custom Building
Custom city MOCs encompass anything you design yourself, from faithful recreations of real buildings to pure imagination. This approach offers unlimited flexibility within the constraints of parts availability and your skill level.
What Defines Custom City MOCs
Any non-set building you design yourself qualifies as custom, regardless of complexity. A simple two-story shop is custom. A massive department store is custom. Converting a non-modular set to modular scale through modifications is custom. The defining characteristic is that you made design decisions rather than following instructions.
These buildings can match your city’s specific needs precisely. Need a narrow building to fill a gap? Design one. Want a building in colors that complement your existing structures? Choose them. This customization creates coherent cityscape rather than a collection of individual sets.
Unlimited creativity within parts availability means you’re constrained only by physics and budget, not by what Lego decided to produce this year. Your city can explore architectural styles, historical periods, or fantasy themes that official sets never address.
The learning curve varies dramatically. Some techniques transfer intuitively from set building. Others require research, experimentation, and occasional failure. Accept that early custom builds may not achieve the polish of official sets—and that’s perfectly fine.
The Custom Advantage
Exactly the buildings you want means no compromises. If your city needs a fire station in blue and red, you build it. If you envision a Victorian train station with specific proportions, you create it. This control is intoxicating after years of following instructions.
Significantly lower cost per structure makes the biggest practical difference. Parts for a custom modular-sized building typically cost £40-80 / $50-100, compared to £160-280 / $200-365 for official modulars. You can build three custom buildings for the cost of one official set, dramatically accelerating your city’s growth.
Unique city that’s truly yours creates immense satisfaction. When someone compliments your city, you can honestly say “I designed these buildings myself.” The pride in pointing out techniques you developed or solved differently than official designs enhances the entire experience.
Better piece-budget efficiency matters when growing a large city. Custom building teaches you to use common, inexpensive pieces creatively rather than depending on rare expensive elements. This efficiency compounds over time—you waste less money on pieces you don’t ultimately use.
Freedom from set limitations unlocks possibilities official sets never explore. That odd-sized corner lot? Perfect for a custom building. Want to build in unconventional scales for forced perspective? Custom building allows it. These freedoms let you solve city-specific challenges elegantly.
The Custom Challenge
Requires structural knowledge that official sets teach but don’t explicitly explain. Understanding which connections are structurally sound, how to reinforce large sections, and where buildings need hidden support only comes through experience or research. Early custom builds sometimes fail structurally—pieces fall off, walls bow, or roofs sag.
Time-intensive design process delays gratification. Where buying a set provides immediate building satisfaction, custom projects require hours of planning before you place the first brick. For builders who enjoy design work, this is a feature rather than a bug. For those who want to build now, it’s frustrating.
Need sufficient piece inventory prevents starting. You can’t build custom if you don’t own the pieces. This creates a chicken-and-egg problem: you need to build up inventory to enable custom building, but buying pieces without specific projects wastes money. Many builders gradually accumulate inventory through parting out sets and buying common pieces in bulk.
No instructions means every session requires active problem-solving. Following instructions is meditative—you know each step leads toward a proven result. Custom building demands constant attention and decision-making, which can be mentally exhausting after long workdays.
Custom Building Approaches
Custom building exists on a spectrum from barely modified sets to completely original architecture.
Level 1: Parts-Built Official Designs
Following instructions for retired modulars using BrickLink-sourced parts sits at the simplest end of custom building. You gain all the structural and design benefits of official sets while learning parts sourcing, developing inventory, and controlling costs.
Our Brick Bank exemplifies this approach. We downloaded the PDF instructions from Lego’s customer service site (they provide these free for most sets), created a wanted list on BrickLink, sourced parts from multiple sellers to optimize costs, and built following instructions exactly. Total investment: maybe 6 hours of sourcing plus 8 hours of building for a £100 / $130 investment instead of £250+ / $325+ for the complete used set.
This process taught us which pieces are expensive versus cheap, which colors cost premium prices, and where legitimate color substitutions work without impacting appearance. When we build truly custom projects now, these insights make us more efficient designers.
Level 2: Set Adaptations
Modifying existing sets to fit modular format bridges the gap between following instructions and designing from scratch. You start with proven structure and design, then modify dimensions, details, and features to match your vision.
Our Family Reunion Celebration (40726) conversion demonstrates this perfectly. We bought the complete set (£85 / $110), which gave us an excellent building with clear design intent (you can see it below) but non-modular style as it is open at the back. We used an MOC from Rebrickable with some additional parts to make it more square in shape and ensure it had a back wall.
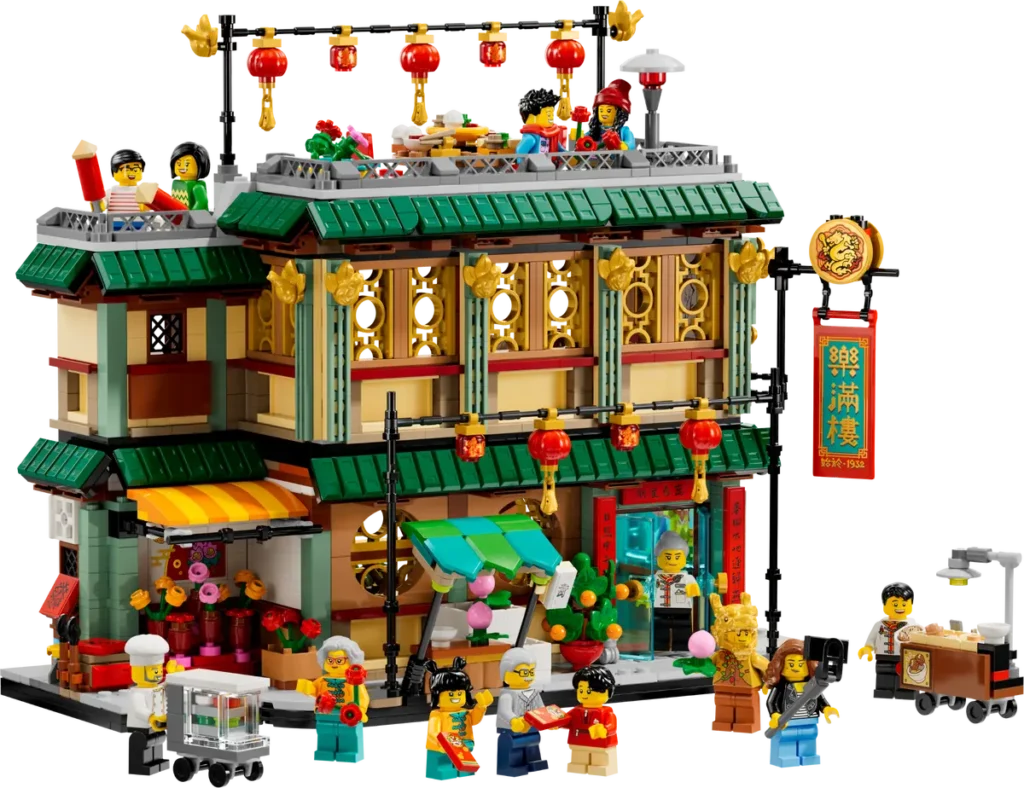
The conversion process taught valuable adaptation skills—how to maintain design intent while changing dimensions, where structural reinforcement becomes necessary, and how to match building styles across different sets.
Kitbashing combines parts from multiple sets in ways their designers never intended. This might mean using a Friends set’s detailed interior with a Creator Expert set’s exterior, or combining buildings from different themes into cohesive structures. This is genuinely creative work with limited risk since you’re working from proven sub-assemblies.
Level 3: Inspired Designs
Using real buildings as reference points creates custom builds with authentic architectural character. You’re not following instructions, but you’re also not designing from pure imagination—you have reference material guiding proportion, detail, and style decisions.
Many city builders photograph local architecture, identify buildings they love, and recreate them in modular scale. This approach teaches architectural observation—you start noticing how windows align, where decorative elements appear, and why certain proportions feel satisfying. Your Lego buildings improve because your understanding of architecture improves.
Following modular proportions while creating original designs maintains consistency across your city. You design within the 32×32 stud footprint, respect the standard height conventions, and use color blocking strategies similar to official sets. The result is buildings that look like they belong together despite being completely custom.
Mixing techniques from various official sets into your designs leverages everything you’ve learned from instructions. That clever window technique from Bookshop? Use it in your custom building. The roof design from Assembly Square? Adapt it to your style. You’re not copying—you’re building a vocabulary of techniques that you apply creatively.
Level 4: Original Architecture
Fully original designs represent the apex of custom building. You’re not adapting sets or referencing instructions—you’re creating from imagination and skill. This level of building requires substantial experience with structural principles, aesthetic judgment, and willingness to iterate repeatedly.
Developing personal building style happens organically as you work at this level. You discover which techniques you enjoy, which details enhance your buildings, and which design approaches feel right to you. Over time, your buildings become recognizable as yours—they share design DNA even while representing different types of structures.
Advanced structural techniques become necessary at this level because you’re pushing boundaries that official instructions stay safely within. Cantilevering sections, creating unusual geometries, or building structures that seem to defy physics all require understanding stress points, legal versus illegal connections, and reinforcement strategies.
The Hybrid Approach: Recommended Strategy
The smartest approach combines all these methods, leveraging advantages of each while their limitations cancel out.
Your First City Should Include:
- 2-3 official modulars (retail or parts-built) at focal points: corners, main intersections, visually prominent positions. These anchor your city aesthetically and technically.
- 1-2 adapted sets (like Friends conversions) providing good value and teaching adaptation skills while filling secondary street frontage.
- 2-3 custom builds of simpler structures (shops, cafes, small apartments) where mistakes matter less and learning costs less.
- Several small custom details like street furniture, vehicles, green spaces, and landscaping that bring everything to life.
Our city follows exactly this pattern. Jazz Club anchors one corner. Brick Bank (parts-built modular) faces it across the street. The Family Reunion conversion creates our residential district entry. Around these anchor buildings, we’ve added smaller custom shops, a coffee cart, street trees, and vehicles that tie everything together visually.
Strategic Placement:
Place modulars at focal points where they command attention and set aesthetic standards. These premium buildings create the visual hierarchy—they’re your downtown, your showpiece buildings, your must-photograph locations.
Position adapted sets filling gaps and extending streets. They provide building mass at medium investment. They’re good buildings that respect modular scale and details without demanding the same attention as your premier structures.
Custom buildings add variety and character throughout. They’re your unique architectural expressions, your problem-solvers for odd spaces, and your experimental zone where you try new techniques without risking expensive pieces.
Small custom details make cities feel alive. Street lighting, outdoor cafe seating, newspaper stands, fire hydrants, trash bins, street trees, crosswalks with actual pedestrians—these details transform static buildings into living urban environments.
This hybrid approach balances budget, time, learning, and visual impact better than any pure strategy. You satisfy the desire for polished, impressive buildings through modulars. You develop custom building skills on smaller, lower-risk projects. You control costs through strategic combinations of purchasing and building.
Skills You’ll Learn From Each
Different building approaches teach complementary skills that compound over time.
From Retail Modulars:
Learning SNOT techniques through instruction is invaluable. Modulars showcase these methods in context, showing not just how to build sideways but why particular orientations solve design problems. Following these instructions builds intuition about when SNOT building makes sense.
Interior detailing methods in modulars are miniature masterclasses. You see how professional designers create furnished spaces that feel real despite severe size constraints. These techniques transfer immediately to your custom work.
Structural stability approaches become obvious through building modulars. You feel which connections are strong, where reinforcement appears, and how buildings remain stable despite complexity. This knowledge prevents structural failures in custom work.
Color blocking strategies in official sets demonstrate how to use color dramatically without creating chaos. You learn which combinations work, where accent colors should appear, and how to maintain cohesion across different colors. This prevents the “rainbow warrior” effect in custom buildings.
Scale consistency across official modulars teaches you to maintain proper proportions. Windows appear at consistent heights. Door sizes remain realistic. Room dimensions feel believable. This intuitive understanding ensures your custom work fits seamlessly with official sets.
From Parts-Built Official Designs:
BrickLink navigation and ordering becomes second nature through necessity. You learn to compare sellers, combine orders efficiently, spot fake parts, and manage shipping logistics. These skills make every future project more affordable and accessible.
Parts substitution decisions teach valuable lessons about where exact matches matter and where good-enough works fine. You discover that some pieces have perfect substitutes, others have acceptable alternatives, and a few demand exact matches. This knowledge informs all future design and purchasing decisions.
Inventory management through multiple orders across months develops organizational discipline. You track what’s ordered, what’s arrived, what’s still needed, and what you can build with current inventory. These skills prevent duplicate purchases and ensure you’re always ready to build something.
Patience and project planning become necessary when projects take weeks to source. You learn to work on multiple projects simultaneously, to enjoy the anticipation of parts arriving, and to see long-term projects as opportunities rather than frustrations. This perspective transforms city building from stressful to meditative.
From Set Adaptations:
Design problem-solving when modifying sets teaches creative thinking within constraints. How do you make a 24-stud building 32 studs wide without just adding empty space? How do you match exterior styling across different sets? These puzzles develop problem-solving skills applicable to all custom work.
Scale consistency when adapting to modular format requires careful attention to proportion. You learn what “feels right” at modular scale, which details need adjustment, and where you can compress or expand without creating awkward appearance.
Structural modifications when changing dimensions expose potential failure points. Adding width requires understanding where load-bearing structures exist. Increasing height demands reinforcement planning. These lessons prevent custom building failures.
Creative parts usage emerges from adaptation necessity. That specialized piece from the original set might work differently in your modified version. You discover unexpected applications for common pieces, and you learn to see pieces as tools rather than dedicated elements.
From Custom Building:
Original design techniques developed through trial and error become your personal style. You discover building methods that work for you, details that you enjoy adding, and shortcuts that speed your workflow without compromising quality.
Budgeting and part sourcing for custom work develops sophisticated understanding of piece economics. You know which pieces are worth paying premium for, which have affordable alternatives, and where design changes can dramatically reduce costs without impacting appearance.
Structural engineering through experience rather than instruction creates deeper understanding. When your custom build fails structurally, you investigate why, fix it, and remember the lesson. These hard-won lessons stick better than following correct instructions ever could.
Personal style development happens organically as you build more custom works. Your buildings start looking cohesive not because you’re following rules, but because you’ve internalized your aesthetic preferences and technical approaches. This style makes your city unmistakably yours.
Your City Starts With One Brick
City building rewards patience, strategic planning, and realistic expectations far more than massive budgets or unlimited space. The most successful cities aren’t necessarily the largest or most expensive—they’re the ones where builders made smart decisions, learned from experience, and let their cities grow organically with their skills and interests.
Our journey from three buildings to 160+ projects in various stages wasn’t planned from the beginning. We didn’t set out to have a massive project queue—it developed naturally as we discovered what we loved building. Some projects complete quickly because we’re excited about them. Others sit partially built for months because we’re waiting for the right pieces or renewed inspiration. Both patterns are healthy and normal.
The key insights we’ve learned: space needs are manageable with proper planning—start small and expand deliberately. Budget matters less than consistency—£40 per month builds impressive cities over time. Mix retail sets, parts-built designs, and adaptations for the best value and variety. Accept that multiple projects “in progress” is normal rather than a sign of disorganization. Your city grows with you, not according to external timelines.
Start where you are with what you have. Maybe that means buying one modular and designing a street around it. Maybe it means adapting a Friends set you already own. Maybe it means sourcing parts for a simple custom building that costs £40. All approaches work—the best starting point is the one that excites you enough to actually begin.
Your first decision isn’t really whether to buy modulars versus building custom—it’s committing to starting at all. Choose one building, any building, and construct it. Learn from that experience. Then choose your second building based on what you learned, what you enjoyed, and what you want to explore next. That’s how cities actually get built—one structure, one decision, one brick at a time.
The hardest part of city building isn’t the technical challenges or budget constraints. It’s simply starting despite the uncertainty and committing to a project that may take months or years to feel “complete.” Remember that cities are never truly finished—they’re just in their current state of evolution. This removes the pressure of perfection and allows you to enjoy the journey.
Take that first step. Measure your available space. Set your monthly budget. Choose your first building. Your city is waiting to be built, and it starts with your decision to begin.
Continue Your Journey
Ready to dive deeper into specific aspects of city building? These resources will help you develop your skills and expand your vision:
Master the techniques: Our SNOT Building Techniques guide explains the critical method used in every modular building, while Advanced Lego Building Techniques covers the full range of construction methods that will elevate your custom builds.
Understand your building blocks: The Lego Glossary defines every term you’ll encounter in city building discussions, from AFOL to modular to MOC. It’s an essential reference for understanding building communities and technique discussions.
Organize for success: City building creates serious parts inventory challenges—our Lego Storage Solutions guide helps you develop systems that make finding pieces easy rather than frustrating, and MOC Planning walks through the process of managing multiple custom projects simultaneously.
Explore related building: If you’re drawn to the architectural side, Lego Creator Expert Sets showcases impressive display pieces that complement city buildings, and our monthly roundups keep you informed about new releases that might fit your city.
What’s holding you back from starting your Lego city? Is it space, budget, or something else? Are you tempted to buy complete sets or build from parts? Share your specific situation in the comments—I’d love to help you problem-solve your particular challenges and recommend a starting point that fits your circumstances.
Building a city or want to stay informed about new techniques, sets, and building strategies? Subscribe to our newsletter for twice-monthly insights delivered directly to your inbox—no spam, just quality content for adult builders.