
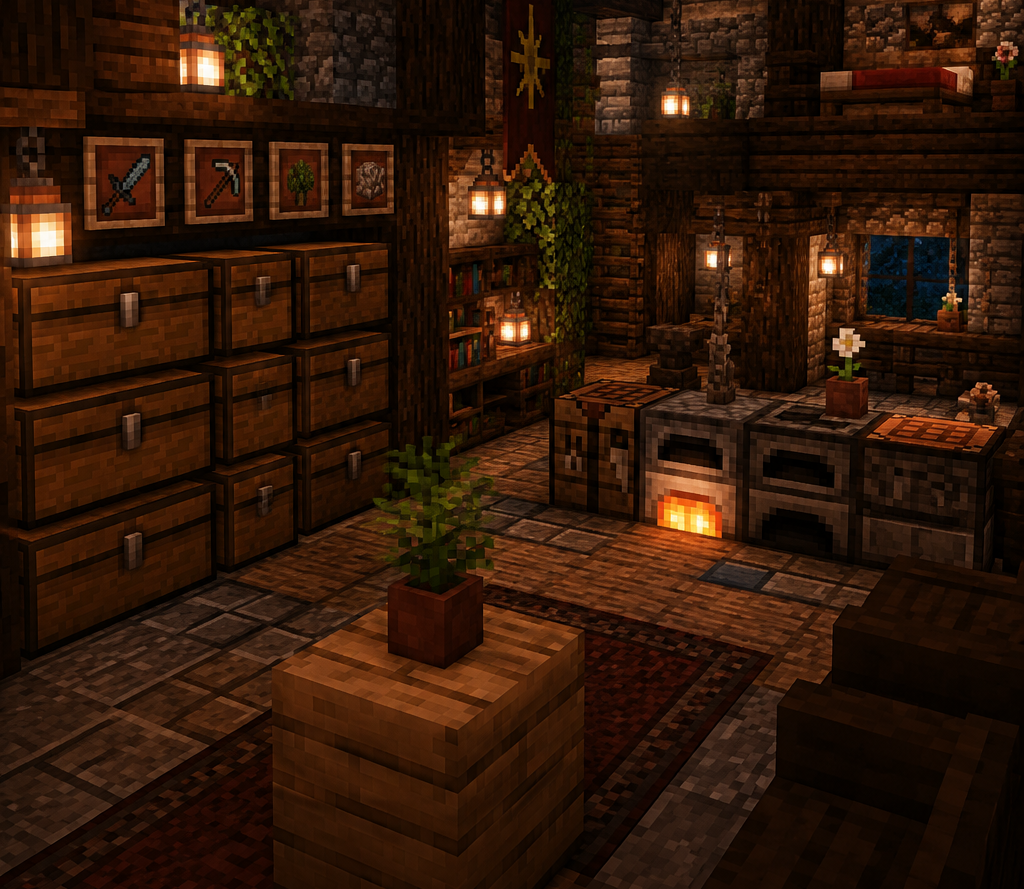
There’s a particular kind of satisfaction that comes from a well-designed survival base. Not the gleaming creative mode showpiece built with unlimited resources, but the space that evolved from a dirt hole with a bed into something genuinely liveable. Something that protects you, organises your gear, and still manages to look intentional. Survival mode interior design is its own discipline, and it deserves to be treated as one.
This guide explores how to approach your base interiors the way serious builders do: with an eye on resource efficiency, progressive development, integrated security, and aesthetics that don’t crumble the moment a creeper tests your perimeter lighting. Whether you’re working on your first proper base or refinishing an established mountain fortress, the principles here will give you a framework that grows with you.
Start With Zones, Not Objects
The most common mistake survival builders make when thinking about interiors is reaching for decoration before function. You start placing item frames, banners and flowerpots when you haven’t yet established where things actually happen. The result is a base that looks dressed but feels chaotic.
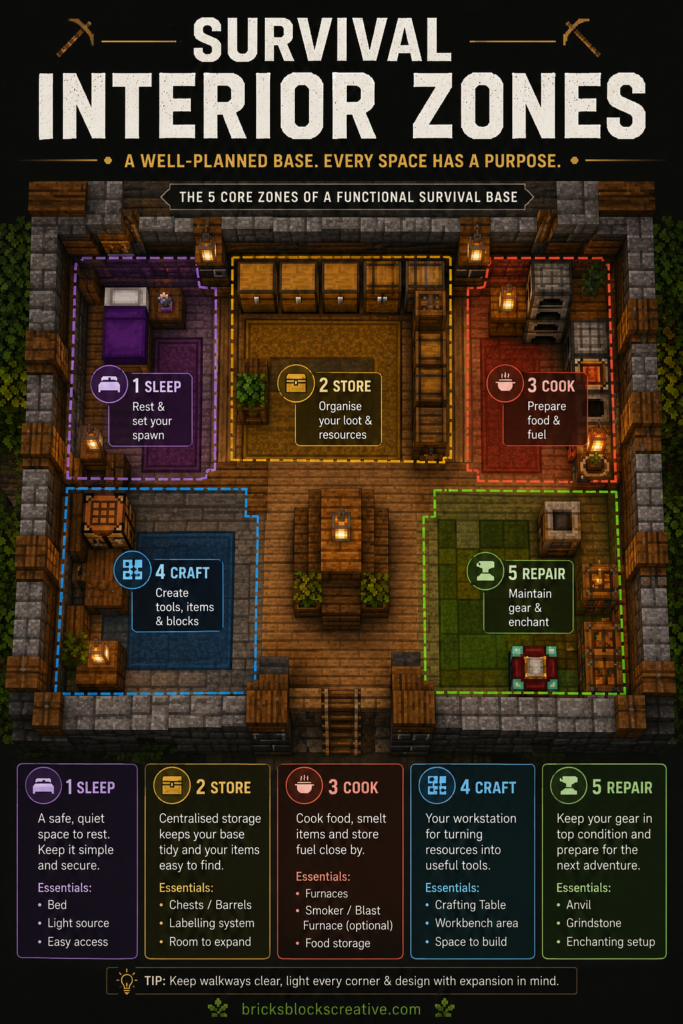
Experienced builders think in zones first. Sleep, store, cook, craft, repair, farm. Each of these activities needs space that’s deliberately assigned to it, even if that space starts as nothing more than a chest and a block of cobblestone. Zoning your base before decorating it means every decorative decision you make later reinforces the room’s purpose rather than fighting against it.
This approach also makes expansion logical. When you’re ready to add an enchanting room, you already know where it slots in. When your storage outgrows its original chest wall, the storage zone has room to breathe into rather than bleeding across the kitchen bench.
The Minimum Viable Base
Before you think about aesthetics at all, ask yourself whether your base covers the essentials. A safe bed, a chest with at least one row of organised storage, a crafting table and furnace, and enough torches that nothing spawns inside. That’s your foundation. It’s not glamorous, but it’s the platform everything else builds on.
Minecraft Storage Solutions: How to Build Organised, Beautiful Living Spaces covers how to evolve that first chest wall into a proper storage system without tearing out your existing layout. Getting storage right early pays dividends across every other part of your interior design, because clutter is always an aesthetic problem, not just a practical one.
Resource-Conscious Design: The Case for Restraint
Survival mode forces a constraint that most designers, Minecraft and otherwise, would actually benefit from: you can’t use what you haven’t earned. That limitation pushes you toward material palettes that are coherent by necessity, and coherence is the foundation of good design.
The survival builder’s equivalent of an interior design palette is usually three to four materials: a primary structural block, a secondary accent, a flooring material and a light source. In early survival, that might be oak planks, cobblestone, dirt or clay floors, and torches. It’s humble, but when used consistently across rooms it reads as intentional rather than improvised.
The principle of “planned scarcity” is worth taking seriously. Limiting yourself to a tight palette and repeating it creates visual rhythm. The alternative is a base where every room uses whatever you happened to mine that week, and the result is visual noise regardless of how much effort you put into individual pieces.
Multi-Use Furniture and the Art of Double Function
Survival interiors benefit enormously from the multi-use thinking that good furniture design has always championed. A barrel serving as both storage and a table surface. A crafting table that doubles as a kitchen bench. A staircase block that reads as a chair at a desk made from slabs. These choices reduce block count while increasing visual complexity, which is exactly what survival mode demands of you.
Advanced Minecraft Furniture: Beyond Basic Chairs and Tables goes deep on the specific block combinations that create convincing furniture from the survival inventory. It’s worth reading before you start furnishing any room, because most builders significantly underestimate what’s achievable with a constrained palette.
Security as a Design Material
In survival, security isn’t a feature you bolt onto a finished base. It’s a layer of the design that should be woven through every decision you make about layout, lighting and access. The builders who get this right don’t have bases that look fortified. They have bases that look considered, where the security is invisible until you try to bypass it.
Think of lighting as your primary defensive tool. Mobs spawn in darkness, which means every dark corner inside or immediately outside your base is a liability. But torch placement is also a spatial design decision: how you light a room shapes its atmosphere entirely. Minecraft Lighting Design: Creating Mood and Atmosphere treats this as the design question it is, rather than just a mechanical one. Strategic lighting eliminates the dark corners that both ruin aesthetics and invite unwanted visitors.
Integrating Defences Without Announcing Them
Fences, walls and defensive perimeters don’t have to declare themselves. In the same way that a well-placed bookshelf can suggest a room boundary, a fence line with lanterns on the posts reads as a garden boundary rather than a militarised perimeter. A ditch filled with water around your base perimeter can function as both a moat and a decorative feature, particularly in biomes where it looks natural.
The security layer that most survival builders neglect is the vertical one. A base with unlit roof access or open skylights is exposing itself from above. Consider whether your roof design gives you clearance around windows, and whether any upper-floor access points are intentional. Defensive thinking doesn’t mean ugly thinking. It means the threats are accounted for in the design rather than noticed after the fact.
Nether Redstone Engineering: Automation and Security covers more advanced security integration for established bases, including automated door systems and observer-based perimeter alerts. These are later-game additions, but knowing they exist can inform how you lay out your base in earlier phases.
Progressive Development: Building That Evolves
The biggest conceptual shift for survival builders moving from functional to beautiful is accepting that the base isn’t built in a single session. Survival interiors level up. They earn their refinement. And that’s not a limitation to work around; it’s the entire character of the thing.
The most useful framework for thinking about this is a three-phase model. Every room goes through all three phases eventually, but rarely at the same time, and the base always contains rooms at different stages of development simultaneously. That’s not disorder. That’s a living space with a history.
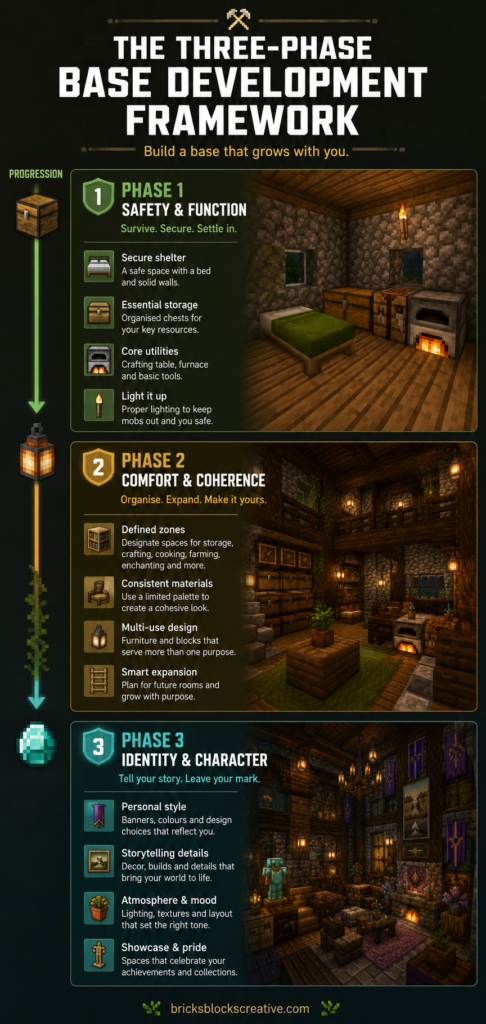
Phase One: Safety and Function
Phase one is exactly what it sounds like. A bed that won’t let you respawn into a hostile environment. Lighting that covers every spawnable surface. Storage that’s labelled even if it’s not beautiful. Doors that can be secured. A crafting area that’s reachable quickly.
This phase deserves more creative investment than most builders give it. The temptation is to rush through it to get to decorating, but a well-organised phase one layout makes phases two and three significantly easier. Think about traffic flow. Where do you naturally walk when you enter the base? That path should be clear. Where do you go when you’ve just come back from mining? The storage should be on that route.
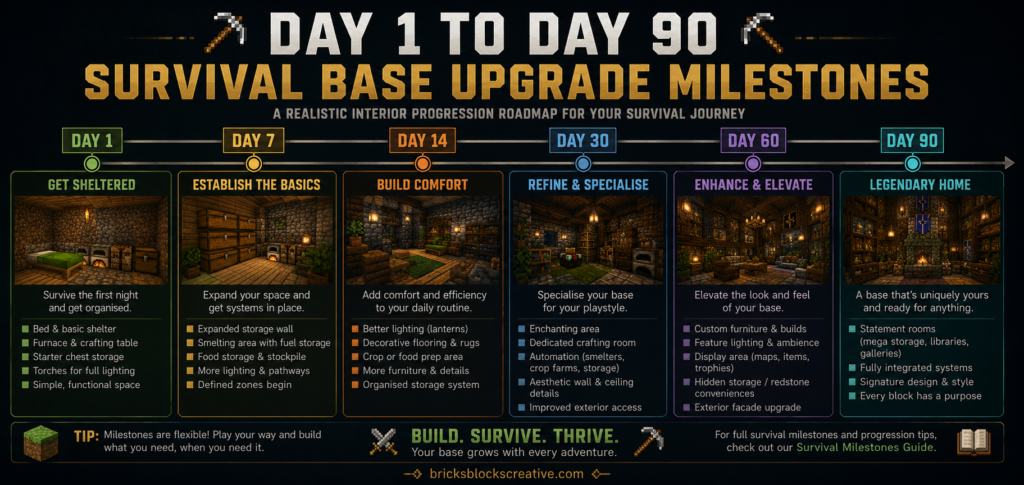
Minecraft Survival Housing Deadlines: 10 Base Upgrade Milestones to Hit by Day 30, 60, and 90 is a practical reference for pacing phase one development, particularly useful if you tend to either rush ahead or get stuck in the first phase indefinitely.
Phase Two: Comfort and Coherence
Phase two begins when the immediate threats are managed and your resource flow is stable. This is where you make deliberate material choices, start replacing placeholder blocks, and establish the visual identity of each room.
Comfort in a survival base means readability. Can you immediately see where to sleep, where to cook, where to store, where to work? It means ergonomic layout: the furnace near the food storage, the crafting table near the chest with your raw materials, the bed away from the main traffic path. It means lighting that doesn’t look like panic torches on every flat surface.
This is also the phase where you make decisions about flooring, ceiling height and window placement that will shape the feel of the base permanently. Spend more time here than feels necessary. It’s harder to change room proportions later than it is to change what’s in them.
Phase Three: Identity and Character
Phase three is where the base starts to express something specific about who you are as a builder. Artwork on the walls. Colour accents through a secondary material. Custom lighting setups. Book collections. Plants and organic elements where they feel right.
These additions are iterative: one more item frame, one better light placement, one accent block replacing a wall section. The accumulation of small decisions is what distinguishes a base with character from one that looks like a default template. Apartment Building Interiors: Urban Minecraft Living demonstrates how deliberate phase three decisions create distinct room identities within a larger structure, which is useful reference even if you’re not building urban architecture.
Mob-Proofing Without Sacrificing Aesthetics
Mob-proofing is the survival builder’s version of designing for real-world chaos. You’re making decisions that have to hold up under stress, not just look good in screenshots. The good news is that the design principles that make a base mob-proof are almost identical to the ones that make a space feel considered and well-built.
Solid materials in high-traffic areas. Clear circulation paths that don’t funnel you into corners. Lighting that covers the volume of a room rather than just its floor. These are defensively sound decisions that also happen to produce better-feeling spaces.
The Role of Perimeter Design in Interior Aesthetics
What happens outside your base directly affects what’s possible inside it. A well-designed perimeter, whether that’s a fence line, a moat, a wall, or a combination, means you’re not fighting emergency situations every time you open a door. That reduces the defensive burden on your interior design and allows you to make bolder aesthetic choices inside.
Stylish barriers read as design features rather than panic responses. Hedges of leaf blocks. Low walls using a complementary material to your main build. Planters and fencing that define approach paths. These create visual interest around your base while performing their defensive function quietly. Ghast-Proofing Your Nether Base: Complete Defense Guide approaches this problem specifically for Nether environments, but the underlying logic of making defensive elements visually intentional applies to any biome.
Hidden Storage for Valuable Items
One mob-proofing consideration that doubles as an interior design opportunity is the vault room or hidden storage area. In survival, you will eventually accumulate materials you can’t afford to lose, whether that’s rare enchanted gear, precious resources or hard-won items that would take significant time to replace.
Building a dedicated secure storage space doesn’t have to look like a vault. It can be a back room behind a bookcase door, a false floor with a trapdoor disguised by a rug of carpet blocks, or an extra room in a basement that isn’t visible from the main corridors. The best hidden storage integrates into the design so naturally that it reads as an intentional room, not a bolt-on panic space.
Mansion Interior Design: Large-Scale Lived-In Luxury in Minecraft covers room-within-a-room design at scale, including how to make secondary spaces feel deliberate rather than accidental, which is directly applicable to secure storage design.
Putting It Together: The Survival Interior Mindset
The through-line in all of this is resilience. Survival mode interior design isn’t about perfection. It’s about building spaces that function under real conditions, hold up to the chaos of active gameplay, and still feel intentional when you walk through them. Beauty in a survival base isn’t decoration added to a functional shell. It’s the product of every functional decision being made with care.
Start with zones. Constrain your palette. Let security be a design layer rather than an afterthought. Build in phases and let the base earn its refinement over time. Approach mob-proofing as an aesthetic challenge rather than just a mechanical one. These habits produce bases that look built by someone who knows what they’re doing, because they are.
Your current survival base probably has more design potential than you’re giving it credit for. The dirt walls and the mismatched chests and the panic torches are just phase one. Everything that comes after is up to you.
Continue Your Journey
Minecraft Storage Solutions: How to Build Organised, Beautiful Living Spaces — Build the storage foundation that makes every other interior decision easier.
Minecraft Lighting Design: Creating Mood and Atmosphere — Treat lighting as the design tool it really is, not just a mob-prevention measure.
Advanced Minecraft Furniture: Beyond Basic Chairs and Tables — Maximise what you can achieve with a survival-mode block palette.
Minecraft Survival Housing Deadlines: 10 Base Upgrade Milestones to Hit by Day 30, 60, and 90 — A paced upgrade framework for turning a starter shelter into a proper base.
Small Space, Big Impact: Minecraft Tiny Home Interiors — Survival-mode design at its most constrained and most creative.
What phase is your current survival base in? Are you still in the functional-first grind, or have you started refining the aesthetic layer? Let us know in the comments.
Want guides like this in your inbox? Subscribe to the Bricks and Blocks Creative newsletter for weekly building tips and roundups.


